Lantronix Spider SLS200 KVM – Reset to defaults

Tuesday, January 20th, 2026

Lantronix Spider SLS200 KVM – Reset to defaults

If you buy some cheap SLS200 KVM spiders off of eBay, you'll need to reset the configuration of the spider back to its default configuration so that you can access it using the default login and password (and have it set to use DHCP). 

You'll need an ethernet to USB serial cable that you'll plug into the serial port on the spider.

Get it to boot by plugging in both USB connectors so that the device receives the power it needs.  Open Putty and connect to the proper COM port your USB serial cable is providing an interface for.  For me, it was COM3, but you can detect it by going to Device Manager –> Ports (COM & LPT).

With Putty open and receiving the serial output, insert a paperclip or similarly small wire into the Lantronix reset area and press the reset button down. 

With Putty as the active window, press the down key on your keyboard followed by escape.  Now type defaults

The device will reset to defaults.  You can login when it has been reset by using sysadmin as the login and PASS as the password.

Here is the source for the above instructions:  https://ltrxdev.atlassian.net/wiki/spaces/LTRXTS/pages/97944090/Reset+a+Spider+to+factory+defaults+using+the+serial+console+port+and+the+Reset+button | Mirror

Now you can update the firmware to the latest version.  Be sure to check if it is a USB 01 or USB 02 version by looking at the device model sticker on the KVM spider.  If it is USB 01 (older), you can use this firmware:

https://ts.lantronix.com/ftp/spider/4.3.6/spider-v4.3-38143_2025-08-07.zip

Here's a mirror if the above is offline:

Mirror

Using Wireless Adapter as KVM Network Bridge (br0 or br1) – Rocky Linux 9.X

Tuesday, May 20th, 2025

Using Wireless Adapter as KVM Network Bridge (br0 or br1) – Rocky Linux 9.X

They said it couldn't be done, but it can, depending on your wireless adapter card.  I recently bought a Minisforum EM680 Mini PC, and to my surprise, it didn't come with any ethernet ports.  It only has a Wi-Fi PCI-E card in it.  Ok, so that presents a problem, as I wanted to use it as a KVM virtual machine host with bridged networking.  At first, I wasn't able to get this to work, but after finding this post, I got it working!  If your wireless adapter supports 4addr (WDS mode), you can get it working as you normally would when using an ethernet port.  Here's how.

Step 1:  Connect to your desired wireless network normally post installation of Rocky Linux 9.

Step 2:  Create your network bridge configurations as you normally would (not specified in this guide).  My script creates br0 (for use at datacenters with static IPs) and br1 (a general DHCP bridge). 

Step 3:  Enable 4addr for your adapter.

Get the name of your wireless device by running the following command:

ip a

Mine happens to be named wlp1s0. Yours could be different. Make a note of the name of your connected wireless adapter and use it in the below scripts:

sudo nano /etc/systemd/system/4addr.service 

Add the following contents to this file:

[Unit]
Description=wlan-4addr
Wants=network.target
Before=network.target systemd-networkd.service
BindsTo=sys-subsystem-net-devices-wlp1s0.device
After=sys-subsystem-net-devices-wlp1s0.device

[Service]
Type=oneshot
ExecStart=/usr/sbin/iw dev wlp1s0 set 4addr on
RemainAfterExit=yes

[Install]
WantedBy=multi-user.target

Save and exit.

Enable the service at boot:

sudo systemctl enable 4addr.service 

Step 4:  Reboot

Step 5:  Check that 4addr is on and working

iw dev wlp1s0 info

You should see something like:

4addr: on 

At the end of the output. 

Step 6:  Configure your wireless adapter to be controlled by your desired network bridge.  In my case, I wanted my wireless adapter to be a part of br1 (my general DHCP bridge).  To do this, I edited the associated .nmconnection file in the /etc/NetworkManager/system-connections directory.  The name of the .nmconnection file will be the wireless SSID you're connected to.  So, for example, if your SSID is test, it will be named test.nmconnection.

Add the controller and port-type configuration lines as shown in the below sample configuration.  My .nmconnection configuration looks like this (SSID and passwords removed):

[connection]
id=cool
uuid=015a8f8f-5440-40b5-8caf-e6ff3f9d63e1
type=wifi
interface-name=wlp1s0
controller=br1
port-type=bridge

[wifi]
mode=infrastructure
ssid={WIFI_SSID_HERE}

[wifi-security]
auth-alg=open
key-mgmt=wpa-psk
psk={WIFI_PASSWORD_HERE}

[bridge-port]

Save your changes.

My ifcfg-br1 bridge configuration file in the /etc/sysconfig/network-scripts directory looks like this:

TYPE=Bridge
BOOTPROTO=dhcp
DEVICE=br1
ONBOOT=yes
ZONE=public

Step 7:  Reboot

KVM guests using br1 and the default NAT interface (managed by QEMU and KVM) will work just fine via your wireless device now!

CentOS LVM and Software RAID Partitioning Instructions

Sunday, May 30th, 2021

Installing and Configuring CentOS to Host KVM Virtual Machines

GUI

When configuring a fresh install of CentOS for a KVM host machine (the main server that hosts all of the virtual machines), I like to run a GUI to make managing some of the virtual machines easier.  Thus, during install, choose the options for CentOS with Minimal GUI:

RAID 10 LVM Partitions

When configuring the hard drive partitions, set it up to use RAID 10 LVM SOFTWARE RAID:

Create volume group called "vms" without the quotes that is setup as RAID 10 (set volume group space to be as large as possible).

Set the "/" partition to 100GB XFS LVM (RAID10).

Set the "swap" partition to 32GB.

Only setup those two partitions.  The remaining space in the RAID 10 volume group "vms" will be used for KVM containers (and the remaining space does NOT need to be assigned to any mount points).

That's all.

Increasing KVM Guest Hard Disk (Hard Drive) Space

Sunday, May 30th, 2021

Increasing KVM Guest Hard Disk (Hard Drive) Space

Increasing the hard drive space in a KVM guest can be rather tricky.  The first step is to shutdown (completely turn off) the guest machine by running the below command from the guest system:

sudo shutdown -h now

Once the guest machine has been turned off (verify it is off by using sudo virt-manager on the host machine to see if it's no longer running), on the host machine, resize the LVM partition by running the following command (and adjust the size as necessary):

sudo lvextend -L+78G /dev/vg_vps/utils

If you need help identifying the name of the disk your guest has been assigned, run this command from the host:

sudo virsh domblklist {VIRSH_NAME_OF_VIRTUAL_MACHINE}

For my example, I would use this command:

sudo virsh domblklist utils

From the host machine, download the GParted live ISO image for your system's architecture (x86 or x64).  Start virt-manager:

sudo virt-manager

Assign a CD drive to the virtual machine you're expanding the hard drive space for, and assign / mount the GParted ISO to it.  Change the boot order so that the KVM guest boots from the CD first.  Save your settings and start the KVM guest virtual machine.  Boot into GParted Live.  GParted will run automatically.  Use GParted to expand the partitions so that they make use of the added storage based on your own preferences.  Apply the resize operation.  Exit GParted and shutdown the virtual machine so that it's off again. Remove the CD drive from the boot options from virt-manager, and then start the KVM guest again. 

If Guest Doesn't Use LVM Partitioning

If your KVM guest virtual machine hasn't been configured to use LVM, the added hard drive space should already be available to your system.  Verify it has been expanded by again running the df -h command.  You're done!

If Guest Uses LVM

Let the OS boot.  From the guest, the file system needs to be resized itself.  You can do this by running the following command to see the current space allocated to your system's partitions:

df -h

You'll see a bunch of output similar to:

Filesystem                  Size  Used Avail Use% Mounted on
udev                        2.9G     0  2.9G   0% /dev
tmpfs                       597M  8.3M  589M   2% /run
/dev/mapper/utils--vg-root  127G   24G   98G  20% /
tmpfs                       3.0G     0  3.0G   0% /dev/shm
tmpfs                       5.0M     0  5.0M   0% /run/lock
tmpfs                       3.0G     0  3.0G   0% /sys/fs/cgroup
/dev/vda1                   720M   60M  624M   9% /boot
tmpfs                       597M     0  597M   0% /run/user/1000

You'll notice that the added hard drive space doesn't show up on any of the partitions.  However, it is available to be assigned to these partitions.  To assign additional space, you will need to resize it using these commands (run from the guest virtual machine… the machine you're resizing):

lvextend /dev/mapper/utils--vg-root -L +78G
resize2fs /dev/mapper/utils--vg-root

Obviously, you need to substitute the name of the LVM partition with the one from your system shown in your output of the df -h command.

Resources

https://tldp.org/HOWTO/LVM-HOWTO/extendlv.htmlMirror if Offline

https://sandilands.info/sgordon/increasing-kvm-virtual-machine-disk-using-lvm-ext4Mirror if Offline

CentOS – Using NAT with KVM Guests

Wednesday, July 17th, 2019

CentOS – Using NAT with KVM Guests

Please note that all commands in this guide must be run on the main HOST machine (the physical machine).  They should not be run on KVM guests (virtual machines).

If your server has a limited number of IPv4 addresses, it might be best to setup and run some virtual machines that are configured to use the default NAT network interface that KVM provides.  This will allow you to run multiple virtual machines that share the same IP address.  Think of it as setting up a home network with multiple devices with certain ports forwarded to specific devices for incoming connections.

First, create the virtual machines that are going to use NAT using virt-manager as you normally would.  In the virtual machine configuration wizard, assign the default NAT network interface named "virbr0".  After the virtual machines have been created, shut down the virtual machines.  Now, we'll assign these virtual machines static LAN IP addresses so that we can port forward certain ports and always have them reach the proper virtual machines. 

The first thing we need to do is get the MAC address of each virtual machine.  Write down the name of the virtual machine and its MAC address, as we'll need this information later on when we edit the NAT interface and assign static LAN IP addresses to our virtual machines.  Run this command to retrieve the MAC address for a specific virtual machine.

virsh dumpxml VM_NAME | grep -i '<mac'

Using the MAC address information from the VMs we want to use NAT with, edit the default NAT interface by running the below command. 

virsh net-edit default

If for some reason the NAT interface is not named default, you can find it by running the below command:

virsh net-list

After the <range /> entry, assign the static LAN IP addresses similar to the following:

<dhcp>
      <range start='192.168.122.2' end='192.168.122.254'/>
      <host mac='52:54:00:ff:4a:2a' name='vm1' ip='192.168.122.13'/>
      <host mac='52:54:00:bb:35:67' name='vm2' ip='192.168.122.14'/>
      <host mac='52:54:00:aa:d9:f2' name='vm3' ip='192.168.122.15'/>
</dhcp>

Save the file with your desired values and quit the editor.  Restart the NAT interface by running the below commands:

virsh net-destroy default
virsh net-start default

Now, you'll need to setup your iptables port forwarding rules.  Adjust the below rules as necessary (changing the port numbers to the ones you want to use) and then save them so that they persist:

iptables -I FORWARD -o virbr0 -d 192.168.122.13 -j ACCEPT
iptables -t nat -I PREROUTING -p tcp --dport 39989 -j DNAT --to 192.168.122.13:39989
iptables -I FORWARD -o virbr0 -d 192.168.122.14 -j ACCEPT
iptables -t nat -I PREROUTING -p tcp --dport 39990 -j DNAT --to 192.168.122.14:39990
iptables -I FORWARD -o virbr0 -d 192.168.122.15 -j ACCEPT
iptables -t nat -I PREROUTING -p tcp --dport 39991 -j DNAT --to 192.168.122.15:39991
iptables -t nat -A POSTROUTING -s 192.168.122.0/24 -j MASQUERADE
iptables -A FORWARD -o virbr0 -m state --state RELATED,ESTABLISHED -j ACCEPT
iptables -A FORWARD -i virbr0 -o br0 -j ACCEPT
iptables -A FORWARD -i virbr0 -o lo -j ACCEPT
iptables-save
service iptables save

Congrats, your virtual machines are now using NAT, have been assigned static LAN IP addresses, and iptables rules on the host server have been configured to port forward specific ports to each NAT VM.


Persistently Saving NAT Port Forward Rules

The only solution I found that would persistently save my NAT forwarding rules is to create a libvirt hook bash script as mentioned here

service iptables stop
iptables -F
service iptables save
service iptables start
mkdir -p  /etc/libvirt/hooks
nano  /etc/libvirt/hooks/qemu

The contents of the "/etc/libvirt/hooks/qemu" file should look similar to the following:

#!/bin/bash
# IMPORTANT: Change the "VM NAME" string to match your actual VM Name.
# In order to create rules to other VMs, just duplicate the below block and configure
# it accordingly.
if [ "${1}" = "vm1" ]; then   # Update the following variables to fit your setup
   GUEST_IP=192.168.122.13
   GUEST_PORT=39989
   HOST_PORT=39989   
   if [ "${2}" = "stopped" ] || [ "${2}" = "reconnect" ]; then
    /sbin/iptables -D FORWARD -o virbr0 -d  $GUEST_IP -j ACCEPT
    /sbin/iptables -t nat -D PREROUTING -p tcp --dport $HOST_PORT -j DNAT --to $GUEST_IP:$GUEST_PORT
   fi
   if [ "${2}" = "start" ] || [ "${2}" = "reconnect" ]; then
    /sbin/iptables -I FORWARD -o virbr0 -d  $GUEST_IP -j ACCEPT
    /sbin/iptables -t nat -I PREROUTING -p tcp --dport $HOST_PORT -j DNAT --to $GUEST_IP:$GUEST_PORT
   fi
fi
if [ "${1}" = "vm2" ]; then   # Update the following variables to fit your setup
   GUEST_IP=192.168.122.14
   GUEST_PORT=39990
   HOST_PORT=39990   
   if [ "${2}" = "stopped" ] || [ "${2}" = "reconnect" ]; then
        /sbin/iptables -D FORWARD -o virbr0 -d  $GUEST_IP -j ACCEPT
        /sbin/iptables -t nat -D PREROUTING -p tcp --dport $HOST_PORT -j DNAT --to $GUEST_IP:$GUEST_PORT
   fi
   if [ "${2}" = "start" ] || [ "${2}" = "reconnect" ]; then
        /sbin/iptables -I FORWARD -o virbr0 -d  $GUEST_IP -j ACCEPT
        /sbin/iptables -t nat -I PREROUTING -p tcp --dport $HOST_PORT -j DNAT --to $GUEST_IP:$GUEST_PORT
   fi
fi
if [ "${1}" = "vm3" ]; then   # Update the following variables to fit your setup
   GUEST_IP=192.168.122.15
   GUEST_PORT=39991
   HOST_PORT=39991
   if [ "${2}" = "stopped" ] || [ "${2}" = "reconnect" ]; then
        /sbin/iptables -D FORWARD -o virbr0 -d  $GUEST_IP -j ACCEPT
        /sbin/iptables -t nat -D PREROUTING -p tcp --dport $HOST_PORT -j DNAT --to $GUEST_IP:$GUEST_PORT
   fi
   if [ "${2}" = "start" ] || [ "${2}" = "reconnect" ]; then
        /sbin/iptables -I FORWARD -o virbr0 -d  $GUEST_IP -j ACCEPT
        /sbin/iptables -t nat -I PREROUTING -p tcp --dport $HOST_PORT -j DNAT --to $GUEST_IP:$GUEST_PORT
   fi
fi

Save and exit.  Make the script executable.

Here is an example of forwarding multiple ports with one entry:
 

if [ "${1}" = "vm_name" ]; then
   # Update the following variables to fit your setup
   GUEST_IP=192.168.122.3
   GUEST_PORTS=(15231 15232 15233)   
   if [ "${2}" = "stopped" ] || [ "${2}" = "reconnect" ]; then
        for i in ${GUEST_PORTS[@]}; do
            /sbin/iptables -D FORWARD -o virbr0 -d  $GUEST_IP -j ACCEPT
            #/sbin/iptables -t nat -D PREROUTING -p tcp --dport ${i} -j DNAT --to $GUEST_IP:${i}
            /sbin/iptables -t nat -D PREROUTING -p tcp --dport ${i} -j DNAT --to $GUEST_IP:${i}
            #/sbin/iptables -t nat -D PREROUTING -p udp --dport ${i} -j DNAT --to $GUEST_IP:${i}
            #/sbin/iptables -t nat -D PREROUTING -p all -j DNAT --to $GUEST_IP:${i}
        done
   fi
   if [ "${2}" = "start" ] || [ "${2}" = "reconnect" ]; then
        for i in ${GUEST_PORTS[@]}; do
            /sbin/iptables -I FORWARD -o virbr0 -d  $GUEST_IP -j ACCEPT
            #/sbin/iptables -t nat -I PREROUTING -p tcp --dport ${i} -j DNAT --to $GUEST_IP:${i}
            /sbin/iptables -t nat -I PREROUTING -p tcp --dport ${i} -j DNAT --to $GUEST_IP:${i}
            #/sbin/iptables -t nat -I PREROUTING -p udp --dport ${i} -j DNAT --to $GUEST_IP:${i}
            #/sbin/iptables -t nat -I PREROUTING -p all -j DNAT --to $GUEST_IP:${i}
        done
   fi
fi
chmod +x /etc/libvirt/hooks/qemu

If you're attempting to forward incoming traffic (only traffic originating from the outside), be sure to exclude the main virbr0 interface so that requests originating from the DHCP LAN aren't forwarded to itself.  This is helpful for port forwarding DNS (port 53).  Incoming requests from outside of the network will be forwarded to the specified server, but outgoing DNS requests made from the server will NOT be forwarded back to itself.  Basically, you want to forward all traffic on port 53 to that specific server except for traffic that originates from that server.  So, be sure to add this line if that is the case:

/sbin/iptables -t nat -I PREROUTING \! -i virbr0 -p udp --dport 53 -j DNAT --to $GUEST_IP:$GUEST_PORT

More information can be found here:  https://serverfault.com/questions/1042383/kvm-port-forwarding-port-53-to-guest-via-nat-temporary-failure-in-name-resolut/1042394#1042394

Reboot the host server.


Old Instructions for Persistent Saving (Non-Working)

If your iptables forwarding rules are not persisted after the host machine is rebooted or shutdown, run the following commands:

sudo -i
yum install -y iptables-services
systemctl stop firewalld
systemctl disable firewalld
systemctl enable iptables
nano /etc/sysconfig/iptables-config 

Change the below values to "yes":

IPTABLES_SAVE_ON_RESTART="yes"
IPTABLES_SAVE_ON_STOP="yes"

Save and exit.  Reboot the server.

If you're still having issues, try this (will clear your existing iptables rules):

iptables-save > iptables_bk
service iptables stop
iptables -F
<run iptables NAT rules here>
<run any other iptables rules you want>
service iptables save
service iptables start

More Detailed Guide

Copying LVM Containers from One Remote Server to Another

Saturday, April 27th, 2019

Transferring LVM Containers

Before you transfer a KVM container to another machine, create a KVM virtual machine on the target server with the same or larger disk size than the container being transferred. 

You can see a full list of LVM containers by using the below command:

sudo lvdisplay

Copying an LVM Container from the Local Machine to a Remote Server

sudo -i
dd if=/dev/vms/phpdev bs=4096 | pv | ssh -c aes128-gcm@openssh.com root@IPADDRESS_HERE -p SSH_PORT 'dd of=/dev/pool/phpdev bs=4096'

Adjust the above pool paths as necessary since this may vary from server to server. 

Copying an LVM Container from a Remote Machine to the Local Machine

sudo -i
ssh -c aes128-gcm@openssh.com root@IPADDRESS_HERE -p SSH_PORT "dd if=/dev/vms/phpdev bs=4096" | dd of="/dev/vms/phpdev" bs="4096"

Adjust the above pool paths as necessary since this may vary from server to server. 

With SSH Passphrase Key

If you're using an SSH key that is protected with a passphrase, use the below commands to open the key, provide the passphrase for that key, and copy the containers without being prompted for the passphrase when the container transfer begins:

sudo -i
eval $(ssh-agent)
ssh-add /root/keys/{PATH_TO_KEY}
dd if=/dev/pool/test bs=4096 | pv | ssh -c aes128-gcm@openssh.com root@host.com -p {PORT} -i /root/keys/{PATH_TO_KEY} 'dd of=/dev/haha/test bs=4096'

CentOS 7 – Easiest Way to Configure LVM KVM Pool for Virtual Machines

Saturday, April 27th, 2019

Configuring LVM in CentOS

When installing CentOS 7, be sure to only partition the hard drive with about 100GB of space for the OS file system itself.  Leave the rest of the drive unpartitioned.  After CentOS has been successfully installed, run gparted via a terminal using the below command:

sudo gparted

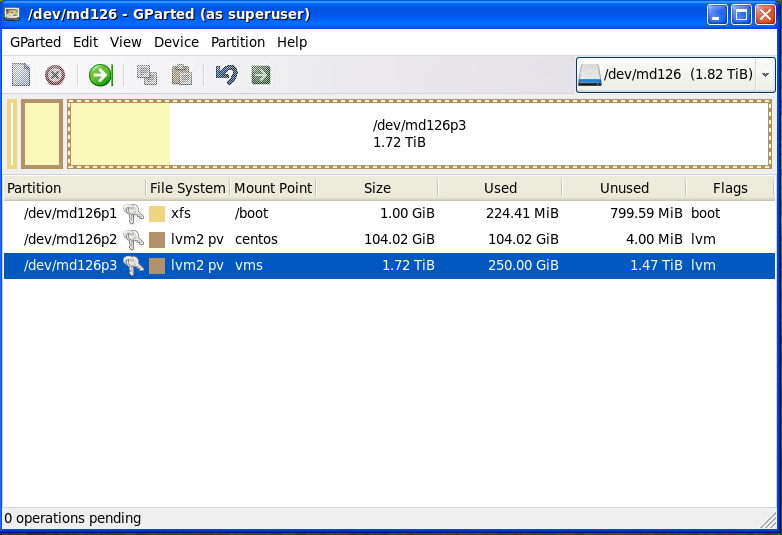
Create a new "LVM2 PV" file system based partition on the drive's remaining space like so:

Now, create the LVM volume group by using the below command and replacing /dev/md126p3 with the new partition's path label:

sudo vgcreate vms /dev/md126p3

Now, launch virt-manager by running the below command:

sudo virt-manager

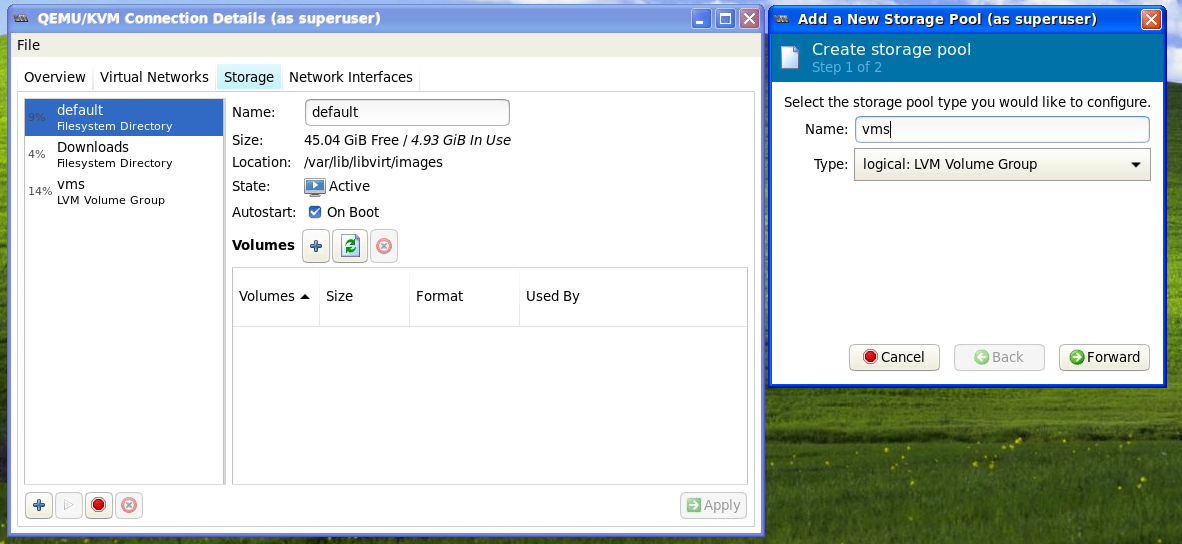
Go to "Edit" –> "Connection Details" –> click on the "Storage" tab.  Click on the "+" icon on the bottom left.  You're now creating a storage pool.  Give it a name like "vms" which is short for virtual machines.  Select "logical: LVM Volume Group" for the type.  Here's a screenshot:

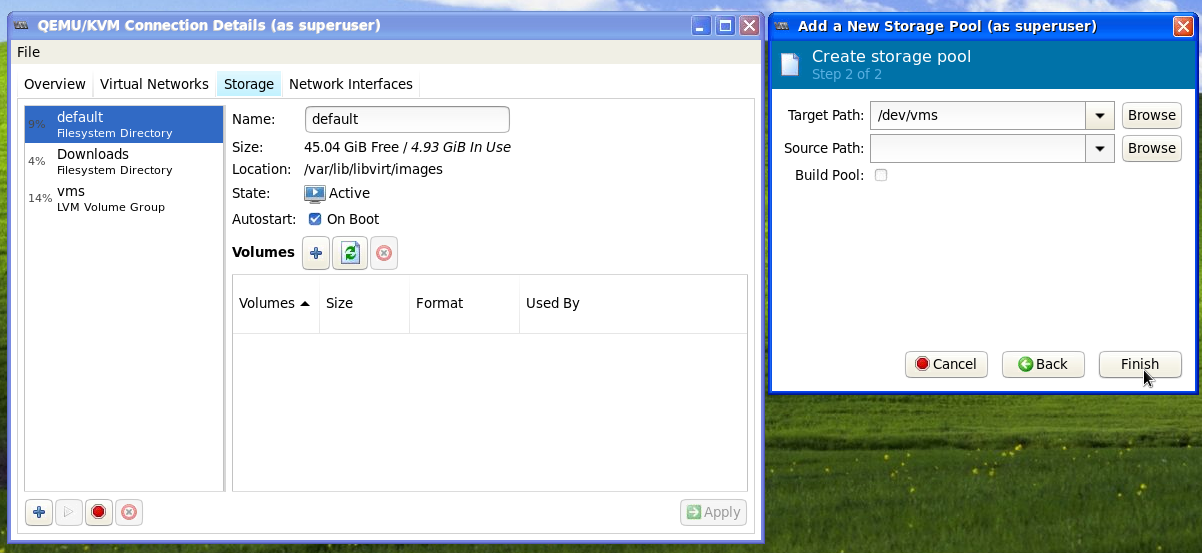
In "Target Path" select the volume group that you created named vms (which you did earlier using the "vgcreate" command).  Do NOT check the "Build Pool" checkbox, and leave the "Source Path" field blank.  Here's a screenshot of what it should look like:

Click on "Finish".  You're done, and you can now create LVM storage containers for your KVM configured pool named vms.

Here's a good LVM KVM Pool guide from RedHat that includes more information (though it's not as simple as following this guide).