Archive for the ‘Guides’ Category

Changing Servers for a Website – Redirect Traffic to New IP for No Downtime While DNS Propagates

Wednesday, December 20th, 2023

Moving a Website to Another Server – Redirect Traffic to the New Server While DNS Propagates (for No Downtime)

If you're migrating a website from one server to another and have updated the DNS for the domain to point to the new server, some traffic will still be directed to the old server due to DNS caching.  So, while the DNS changes propagate over the internet (can take up to three days), you can still redirect traffic to the new server from the old server so that you won't suffer any downtime. 

On the old server, run these commands to redirect web traffic on port 80 (http) and port 443 (https) to the new server (adjust the {DESTINATION_IP_ADDRESS} variable accordingly):

echo 1 >/proc/sys/net/ipv4/ip_forward
iptables -t nat -A PREROUTING -p tcp --dport 80 -j DNAT --to-destination {DESTINATION_IP_ADDRESS}:80
iptables -t nat -A PREROUTING -p tcp --dport 443 -j DNAT --to-destination {DESTINATION_IP_ADDRESS}:443
iptables -t nat -A POSTROUTING -p tcp -d {DESTINATION_IP_ADDRESS} --dport 80 -j MASQUERADE
iptables -t nat -A POSTROUTING -p tcp -d {DESTINATION_IP_ADDRESS} --dport 443 -j MASQUERADE

Reference:  https://serverfault.com/questions/371833/changing-servers-redirect-to-new-ip-no-downtime#371870

Dual Boot Linux (Ubuntu 22.04) and Windows 11 on Modern Systems – UEFI

Thursday, December 7th, 2023

Dual Boot Linux (Ubuntu 22.04) and Windows 11 on Modern Systems – UEFI

In order to setup a dual boot of Windows 11 and Ubuntu 22.04 on a modern system that uses UEFI, follow these steps.

  1. Install Windows 11 first leaving some unpartitioned space (at least 60GB is my recommendation) on the drive you're installing Windows on.
  2. Boot up the Ubuntu installer.
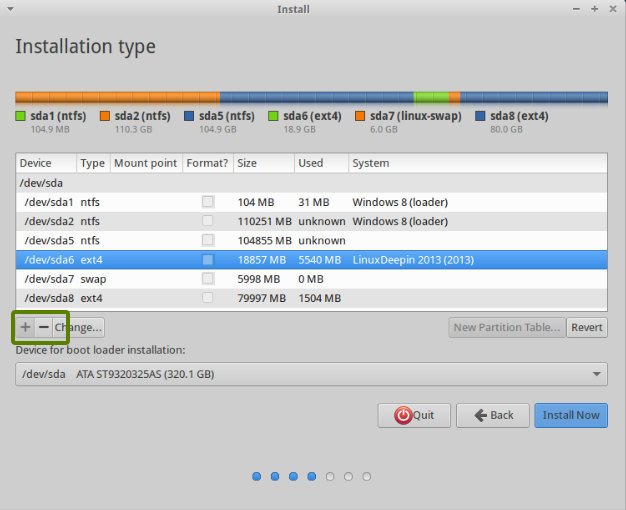
  3. During installation, you'll be presented with an Installation Type options screen.  Choose "Something else". 
  4. On the next screen, you'll see a list of drives and partitions.  On the same drive you installed Windows, create 3 new partitions. 
    1. Create an EXT4 partition for the / mount point at least 40GB in size (this is the main drive for Linux files).
    2. Create a SWAP partition at least 18GB in size.
    3. Create an EFI partition at least 500MB in size.  This is extremely important in order to get grub to install properly. 
  5. Leave the "Device for boot loader installation" set as the top level drive that Windows and Ubuntu was / is being installed on.  You should not select an individual partition here.
  6. Complete the installation process. 
  7. You might need to change the UEFI boot order in the BIOS of your system to boot Ubuntu / Linux first versus booting the Windows EFI partition.  Since you created an EFI partition for your Linux install, it should show up as a bootable option in the bios.  Set / adjust accordingly.
  8. That's it!

Restoring Areca Backups

Friday, October 20th, 2023

Restoring Areca Backups

The first step to restoring an Areca backup image is to map the network drives as they were on the computer you made the backup from (if you were using network drives to store the backup).  If you can't remember how the network drives were initially configured or mapped, proceed to the next step, and Areca will eventually tell you which drive is missing.  Once the drives have been remapped as before, and if the backup file is no longer stored on that mapped drive, copy your Areca backup folder (for example, in my case, the folder named 1878606550) to the backup drive location.   

In order to restore an Areca backup archive onto another computer, you need to copy the bcfg file located in the areca_config_backup folder to the Areca workspace directory on the computer you're attempting to restore the files on.  Once you've done that, you can restart Areca, and you'll be prompted to provide the encryption key.  Enter it here.

Assuming the drives exist as they did on the previous computer and the backup folder exists where the backups were being stored, you should be able to view the files within the Archives tab.  Right click on the backup and choose "Recover".  Follow this wizard, and the files will be unencrypted and extracted.   

Fix for Older SSH Keys Not Working on Windows Git

Friday, September 22nd, 2023

Fix for Older SSH Keys Not Working on Windows Git

If your old SSH keys are not working on Windows after installing the latest Git client and tools, and you're being prompted to login (~/.ssh/config configuration being ignored), the fix is to add the following line to the bottom of the C:\Program Files\Git\etc\ssh\ssh_config file:

Host *
	PubkeyAcceptedKeyTypes +ssh-rsa

That's it.  It will work again. 

Similar fix for Linux: https://blog.eamster.tk/fix-for-ssh-keys-not-working-on-newer-versions-of-debian-ubuntu/

Drive cloning — Larger to smaller hard drive (or SSD) using Clonezilla

Tuesday, July 4th, 2023

Drive cloning — Larger to smaller hard drive (or SSD) using Clonezilla

Requirements:

Ability to use Clonezilla

Ability to use Gparted

Disable Fast Boot in Windows 10 / Windows 11 – Before moving / resizing partitions with GParted

Ability to do simple arithmetic (remember arithmetic?)


Procedure:

Using Clonezilla, I’ve always heard you can only clone a hard drive to a drive that is the same size or bigger. Not so. I just cloned a 250 GB to a 240 GB, and I suspect this method will work for any size drive difference. The only requirement is that the sum of the size of the partitions on the source drive must not be larger than the total size of the target drive. To make this the case, it will probably be necessary to resize the partitions on the source drive using Gparted. Of course, be aware that Gparted can only reduce the size of any partition to no smaller than the amount of data that it holds (known as “used space”).


In my case, the source drive is 250 GB with four partitions – one for Windows XP, one for Windows 7, one for Linux, and one for Linux swap. This is a triple boot PC using Grub2 as the initial boot manager for Linux, and Windows 7 as the secondary boot manager for both XP and 7. So this was a rather unusual boot scenario that I needed Clonezilla to clone correctly.


The target drive was a 240 GB SSD, which should be blank (unpartitioned). If it is not blank, that’s fine, as everything (data and partitions) will be erased by the cloning process automatically by Clonezilla. It will warn you about this several times. So if the target drive has anything on it you want to save, save it before starting the cloning process.


The target drive is 10 GB smaller than the source drive, so the first thing I needed to do was reduce the size of one or more partitions on the source drive by a total of 10+ GB using Gparted. I had over 30 GB of free space on the Windows 7 partition, so I reduced its partition size by 10 GB. I also deleted the 4 GB Linux swap partition after I reconfigured Linux to use a swap file instead of a swap partition, which meant I reduced the size of my partitions by 14 GB overall. Finally, also using Gparted on the source drive, I then moved all the unallocated space to the end of the drive. In my case, to move the unallocated space to the end, I simply moved the Linux partition “to the left” to immediately follow the Windows 7 partition. This is important, as you want your partitions to be contiguous from the beginning of the source drive so that they will all fit on the smaller target drive. The unallocated space, which is now all at the end of the source drive, will be ignored by Clonezilla, as if it isn’t even there. In that way, the source drive appears to be smaller than the target drive to Clonezilla.


Once the source drive is configured like this, it is time to have both source and target drives attached to the computer and boot into Clonezilla from CD (or USB). We are going to do a drive-to-drive copy, using expert mode.


We choose expert mode so we can select the -icds and -rvd (windows and NTFS drives only) options when prompted, in addition to keeping all the pre-set default options.


Finally, when prompted on how to handle cloning the partition table, choose “Use the partition table from the source drive.”


Pay attention to the warnings Clonezilla gives you about erasing the target drive, verifying that the drive it will be erasing is indeed your target drive and not the source drive. Then let Clonezilla do the cloning, and if there are no errors reported due to bad sectors or other unforeseen problems, you should end up with a bootable clone of your once-larger source drive on the smaller target drive. It worked for me.


Image source


Fix for Older SSH Keys Not Working on Newer Versions of Debian / Ubuntu

Thursday, May 25th, 2023

Fix for SSH Keys Not Working on Newer Versions of Debian / Ubuntu

If your old SSH keys are not working on newer versions of Ubuntu / Debian, and you're being prompted to login (~/.ssh/config configuration being ignored), the fix is to add the following line to the bottom of the /etc/ssh/ssh_config file:

    PubkeyAcceptedKeyTypes +ssh-rsa

That's it.  It will work again.  You may need to restart the ssh service

sudo service ssh restart

https://askubuntu.com/questions/1404049/ssh-without-password-does-not-work-after-upgrading-from-18-04-to-22-04

Areca Backup – Getting it to Work in Windows 10 / 11 64-bit

Saturday, March 4th, 2023

Getting Areca Backup to Work on Modern Systems

Unfortunately, Areca Backup hasn't been updated since 2015.  But, it still works great, and it's an awesome program that can compress and encrypt files into a backup archive that can be transferred to a NAS drive or uploaded to the cloud.  However, getting it to work on a modern system can be a chore.  After installing Areca Backup, when you try to launch the application, if nothing happens, you will need to perform both of the following fixes:

Install 32-bit Java first [Windows Offline], and then install 64-bit Java second [Windows Offline (64-bit)] if you have a 64-bit operating system.  Without the 64-bit version of Java, Areca will not launch on a 64-bit system.

The next step to getting Areca to run is to replace the "swt.jar" file in the lib folder found in the installation directory (default is C:\Program Files (x86)\Areca\) with this one:  http://dinofly.com/files/swt.zip

Once the original swt.jar file has been replaced in C:\Program Files (x86)\Areca\lib with the one linked above, Areca will now open and run properly.

Tested on Windows 7 x64, Windows 10 x64, and Windows 11 x64.

Running and Debugging Specific WordPress Cron Hooks Manually Using WP-CLI

Thursday, December 22nd, 2022

Running and Debugging Specific WordPress Cron Hooks Manually Using WP-CLI

If your WordPress instance is configured with debugging turned off (WP_DEBUG set to false in wp-config.php) and you need to troubleshoot, debug, or run a specific WordPress cron hook or function manually, you'll find that it's pretty tough to do so.  Fortunately, I found a relatively easy way to do exactly this using WP-CLI.

Install WP-CLI

Install WP-CLI by using the below commands as root:

sudo -i
curl -O https://raw.githubusercontent.com/wp-cli/builds/gh-pages/phar/wp-cli.phar
chmod +x wp-cli.phar
sudo mv wp-cli.phar /usr/local/bin/wp

Now, change into your WordPress instance vhosts directory:

cd /var/www/vhosts/{YOUR_DOMAIN}/httpdocs

Update the above path as necessary.

To run all the scheduled WordPress cron events, use this command:

wp cron event run --all --allow-root

To run a specific WordPress cron hook, use this command:

wp cron event run "NAME_OF_CRON_HOOK" --allow-root

If you need help determining the name of the cron job hook you specifically want to run or debug, install the WP Control plugin in your WordPress instance. Then visit the /wp-admin/tools.php?page=crontrol_admin_manage_page page to see a list of cron hooks and when they run.  Grab the name from the "Hook" column and update your wp cli command to run that cron event!

You can add echo statements and other code to your individual cron function plugins to better debug and troubleshoot them.

OpenVPN Expired CRL – VPN Won’t Connect

Wednesday, December 7th, 2022

OpenVPN Expired CRL – VPN Won't Connect

Recently, I ran into an issue where OpenVPN was no longer working for existing clients.  After looking at the OpenVPN log in /var/log/openvpn.log, I found the following:

VERIFY ERROR: depth=0, error=CRL has expired:

If you see an OpenVPN error about an expired certificate revocation list (CRL), here's how to generate a new CRL:

cd /etc/openvpn/easy-rsa
EASYRSA_CRL_DAYS=3650 ./easyrsa gen-crl
cp /etc/openvpn/easy-rsa/pki/crl.pem /etc/openvpn/crl.pem
chown nobody:nogroup /etc/openvpn/crl.pem
service openvpn restart

Problem solved!

Support Older TLS Versions in Newer Ubuntu / Debian OS Versions

Monday, December 5th, 2022

Support Older TLS Versions in Newer Ubuntu / Debian OS Versions

Edit openssl.conf file:

sudo nano /etc/ssl/openssl.cnf

Add this line at the top:

openssl_conf = openssl_init

And add these lines at the end:

[openssl_init]
ssl_conf = ssl_sect

[ssl_sect]
system_default = system_default_sect

[system_default_sect]
CipherString = DEFAULT@SECLEVEL=1

https://askubuntu.com/questions/1233186/ubuntu-20-04-how-to-set-lower-ssl-security-level#answer-1296578