Archive for the ‘Rocky Linux’ Category

Dual Boot Linux (Ubuntu 22.04) and Windows 11 on Modern Systems – UEFI

Thursday, December 7th, 2023

Dual Boot Linux (Ubuntu 22.04) and Windows 11 on Modern Systems – UEFI

In order to setup a dual boot of Windows 11 and Ubuntu 22.04 on a modern system that uses UEFI, follow these steps.

  1. Install Windows 11 first leaving some unpartitioned space (at least 60GB is my recommendation) on the drive you're installing Windows on.
  2. Boot up the Ubuntu installer.
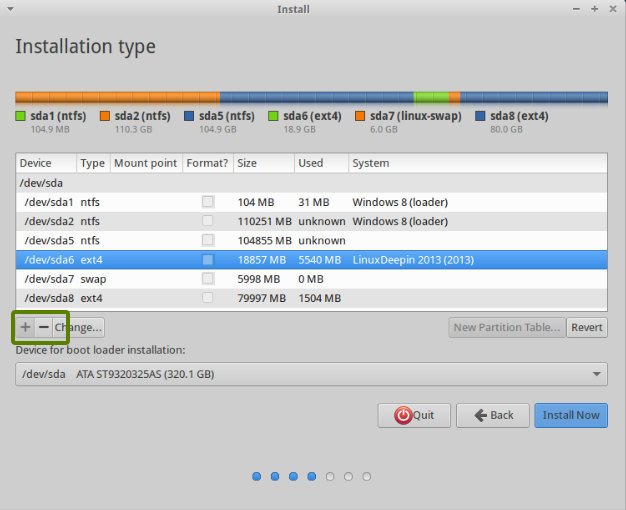
  3. During installation, you'll be presented with an Installation Type options screen.  Choose "Something else". 
  4. On the next screen, you'll see a list of drives and partitions.  On the same drive you installed Windows, create 3 new partitions. 
    1. Create an EXT4 partition for the / mount point at least 40GB in size (this is the main drive for Linux files).
    2. Create a SWAP partition at least 18GB in size.
    3. Create an EFI partition at least 500MB in size.  This is extremely important in order to get grub to install properly. 
  5. Leave the "Device for boot loader installation" set as the top level drive that Windows and Ubuntu was / is being installed on.  You should not select an individual partition here.
  6. Complete the installation process. 
  7. You might need to change the UEFI boot order in the BIOS of your system to boot Ubuntu / Linux first versus booting the Windows EFI partition.  Since you created an EFI partition for your Linux install, it should show up as a bootable option in the bios.  Set / adjust accordingly.
  8. That's it!

RAID Synchronization CRON Job Affecting Performance

Thursday, October 5th, 2023

RAID Synchronization CRON Job Affecting Performance

For some FakeRaid configurations, CentOS 7 and newer variants may run a RAID synchronization job configured in the /etc/cron.d directory in a file named raid-check.

This job is responsible for making sure the RAID array is in sync across all drives.  It runs by default every week on Sunday at 1 AM.

# Run system wide raid-check once a week on Sunday at 1am by default

However, this was not a convenient time for my users, as they were gaming at this time, so rather than affect server performance, I changed the cronjob to:

0 5 1 * * root /usr/bin/test $(/usr/bin/date +\%u) -ne 6 && /usr/sbin/raid-check

Thus, the sync job now runs once a month on the 1st at 5 AM.  And, it will not run if the day of the week is a Saturday.  This applies to several of my C1100 servers.

Manage Dell C1100 CS24-TY Servers Using IPMI Tool

Thursday, December 22nd, 2022

Manage Dell C1100 CS24-TY Servers Using IPMI Tool

Dell C1100 servers can be managed using the IPMI tool which interfaces with the low level BMC interface.  Dell has also released a bmc specific utility that compliments the generic ipmitool to better configure and manage specific settings that are difficult to configure using ipmitool on its own.

Here's how to use both ipmitool and the bmc utilities.  First, login as root:

sudo -i

Now, install the ipmitool:

yum install OpenIPMI ipmitool -y

Start the ipmi service:

service ipmi start

Download the bmc utility:

mkdir -p ~/Downloads/bmc
cd ~/Downloads/bmc
wget -N "http://dinofly.com/files/dell_c1100/bmc-2014-10-15.zip"

If your system is running versions of PERL 5.26 or newer, download this version instead:

# For PERL 5.26+
wget -O "bmc-2014-10-15.zip" -N "http://dinofly.com/files/dell_c1100/bmc-2014-10-15_perl_5.26.zip"

Unzip the bmc tool and make it executable:

unzip bmc-2014-10-15.zip
chmod +x bmc

Here's how to change the BMC interface IP settings:

ipmitool lan set 1 ipsrc static
ipmitool lan set 1 ipaddr x.x.x.x
ipmitool lan set 1 netmask x.x.x.x
ipmitool lan set 1 defgw ipaddr x.x.x.x
./bmc nic_mode set [dedicated|shared]
./bmc allinfo

If the BMC web interace is not responding, try this:

ipmitool bmc reset cold

Rebuilding a Removed / Failed RAID 10 Array in CentOS / Rocky Linux

Tuesday, February 22nd, 2022

Replace Hard Drive in a RAID 10 Array and Sync the RAID 10 Array to the New Hard Drive

I had the hardest time rebuilding a RAID 10 array after replacing a hard drive.  I didn't fail the old hard drive before removing it from the array, and sometimes, this may not be an option.  What happened in my case is the data center replaced the hard drive that I had shipped to them directly from an eBay seller.  I was hoping that the RAID array would rebuild itself onto the new drive (as I have seen happen before in some circumstances).  However, that may not happen if the replacement drive still has its old RAID array or partition information present, and then, it might be difficult to actually get the RAID array to sync to the new drive. 

In my case, I run LVM (Logical Volume Manager) for my partitions.  This complicates the RAID setup, and I found that mdadm commands didn't work as expected.  If this situation occurs, it is best to boot Rocky Linux or CentOS in recovery mode using a Rocky Linux ISO or CentOS ISO.  Once the recovery system loads, drop to a shell without mounting any file systems.  Next, you will need to deactivate your LVM volume group:

vgdisplay
vgchange -a n my_volume_group # deactivate

Next, examine your md RAID array by running the following command:

cat /proc/mdstat

After running that command, I identied my RAID devices as md126 and md127.  /dev/md127 is considered the parent even though /dev/md126 is where everything is. 

I can get more information about the RAID array by running the below commands:

mdadm --detail /dev/md126
mdadm --detail /dev/md127

Let's fail and remove any removed (no longer existing) drives using this command:

mdadm /dev/md126 --remove failed
mdadm /dev/md126 --remove detached
mdadm /dev/md127 --remove failed
mdadm /dev/md127 --remove detached

Next, we need to identify the hard drive we want to add / replace the removed drive in the array:

lsblk

From running the above command, I noticed that the new drive was /dev/sde, so I needed to wipe its old RAID configuration (if there is any) and then add it to the RAID array.

wipefs /dev/sde
mdadm --add /dev/md127 /dev/sde

Check to see if the syncing process has started:

cat /proc/mdstat

You may or may not need to run the below command to get the RAID device to start syncing to the new drive:

mdadm --grow /dev/md126 --raid-devices=4

Helpful Links:

https://delightlylinux.wordpress.com/2020/12/22/how-to-remove-a-drive-from-a-raid-array/
https://serverfault.com/questions/554553/how-to-delete-removed-devices-from-a-mdadm-raid1
https://unix.stackexchange.com/questions/53129/dev-md127-refuses-to-stop-no-open-files
https://access.redhat.com/documentation/en-us/red_hat_enterprise_linux/4/html/cluster_logical_volume_manager/vg_activate
https://serverfault.com/questions/676638/mdadm-drive-replacement-shows-up-as-spare-and-refuses-to-sync
https://serverfault.com/questions/554553/how-to-delete-removed-devices-from-a-mdadm-raid1