Archive for April, 2019

Change the Default Editor to nano in Linux

Saturday, April 27th, 2019

Use nano as the Default Editor

If you hate vi like I do, you can configure Linux to always default to using the nano editor.

Simply add the following to the bottom of the /etc/bashrc file:

export EDITOR="nano"

Save the file.  nano is now the default editor.  When you use

sudo crontab -e

The nano editor will now be used by default.

Configuring Let’s Encrypt Certbot on CentOS 7 with lighttpd

Saturday, April 27th, 2019

Configuring Let's Encrypt Certbot on CentOS 7 with lighttpd

Installing Certbot

First, install certbot by using the below commands:

sudo yum -y install epel-release
sudo yum install certbot

certbot is python based program that allows you to request SSL certificates for your domains. 

Request a Certificate

Use the below command to request a certificate (adjust paths and replace the test.com domain as necessary):

sudo certbot certonly --webroot -w /var/www/vhosts/test/httpdocs -d test.com

A certificate has now been stored in /etc/letsencrypt/live.  Create a combined certificate format by using the below command (replacing test.com with your real domain):

/bin/cat /etc/letsencrypt/live/test.com/cert.pem /etc/letsencrypt/live/test.com/privkey.pem > /etc/letsencrypt/live/test.com/custom.pem && /bin/chmod 777 /etc/letsencrypt/live/test.com/custom.pem && /sbin/service lighttpd restart

Certificate Renewal Cronjobs

You may want to create a cronjob to renew the certificate and a cronjob for regenerating the combined format certificate since the underlying certificate file can change (such as when it's renewed):

sudo crontab -e

Insert the below cronjobs:

0 1 * * 1 /usr/bin/certbot renew --quiet
5 1 * * 1 /bin/cat /etc/letsencrypt/live/test.com/cert.pem /etc/letsencrypt/live/test.com/privkey.pem > /etc/letsencrypt/live/test.com/custom.pem && /bin/chmod 777 /etc/letsencrypt/live/test.com/custom.pem && /sbin/service lighttpd restart

Save your crontab configuration. 

Setting Up Lighttpd to Use SSL Certificate

Edit your default-enabled lighttpd configuration file in /etc/lighttpd/vhosts.d to look similar to the following (replacing test.com with your real domain and adjusting various file paths)

$HTTP["host"] == "test.com" {
  var.server_name = "test.com"
  server.name = server_name  server.document-root = vhosts_dir + "/test/httpdocs"
  #accesslog.filename          = vhosts_dir + "/test/log" + "/access.log"
}
$SERVER["socket"] == ":80" {
  server.document-root = vhosts_dir + "/test/httpdocs"
}
$SERVER["socket"] == ":443" {
    ssl.engine           = "enable"
    ssl.pemfile          = "/etc/letsencrypt/live/test.com/custom.pem"
    server.document-root = vhosts_dir + "/test/httpdocs"
    ssl.ca-file = "/etc/letsencrypt/live/test.com/chain.pem" # Root CA
    server.name = "test.com" # Domain Name OR Virtual Host Name
}

Here's how you can set a different document root for specific https (port 443) virtual hosts:

$SERVER["socket"] == ":443" {
    ssl.engine           = "enable"
    ssl.pemfile          = "/etc/letsencrypt/live/test.com/custom.pem"
    server.document-root = vhosts_dir + "/test/httpdocs/"
    ssl.ca-file = "/etc/letsencrypt/live/test.com/chain.pem" # Root CA
    server.name = "test.com" # Domain Name OR Virtual Host Name
    
    $HTTP["host"] =~ "(^|www\.)somethingelse.test.com" {
        server.document-root = vhosts_dir + "/test/httpdocs/subdir"
    }
}

Save and restart the lighttpd service.

sudo service lighttpd restart

Congrats, SSL is now available on your domain, and your Let's Encrypt certificate has been configured and will be renewed automatically by your cronjob.

Copying LVM Containers from One Remote Server to Another

Saturday, April 27th, 2019

Transferring LVM Containers

Before you transfer a KVM container to another machine, create a KVM virtual machine on the target server with the same or larger disk size than the container being transferred. 

You can see a full list of LVM containers by using the below command:

sudo lvdisplay

Copying an LVM Container from the Local Machine to a Remote Server

sudo -i
dd if=/dev/vms/phpdev bs=4096 | pv | ssh root@IPADDRESS_HERE -p SSH_PORT 'dd of=/dev/pool/phpdev bs=4096'

Adjust the above pool paths as necessary since this may vary from server to server. 

Copying an LVM Container from a Remote Machine to the Local Machine

sudo -i
ssh root@IPADDRESS_HERE -p SSH_PORT "dd if=/dev/vms/phpdev bs=4096" | dd of="/dev/vms/phpdev" bs="4096"

Adjust the above pool paths as necessary since this may vary from server to server. 

With SSH Passphrase Key

If you're using an SSH key that is protected with a passphrase, use the below commands to open the key, provide the passphrase for that key, and copy the containers without being prompted for the passphrase when the container transfer begins:

sudo -i
eval $(ssh-agent)
ssh-add /root/keys/{PATH_TO_KEY}
dd if=/dev/pool/test bs=4096 | pv | ssh root@host.com -p {PORT} -i /root/keys/{PATH_TO_KEY} 'dd of=/dev/haha/test bs=4096'

CentOS 7 – Easiest Way to Configure LVM KVM Pool for Virtual Machines

Saturday, April 27th, 2019

Configuring LVM in CentOS

When installing CentOS 7, be sure to only partition the hard drive with about 100GB of space for the OS file system itself.  Leave the rest of the drive unpartitioned.  After CentOS has been successfully installed, run gparted via a terminal using the below command:

sudo gparted

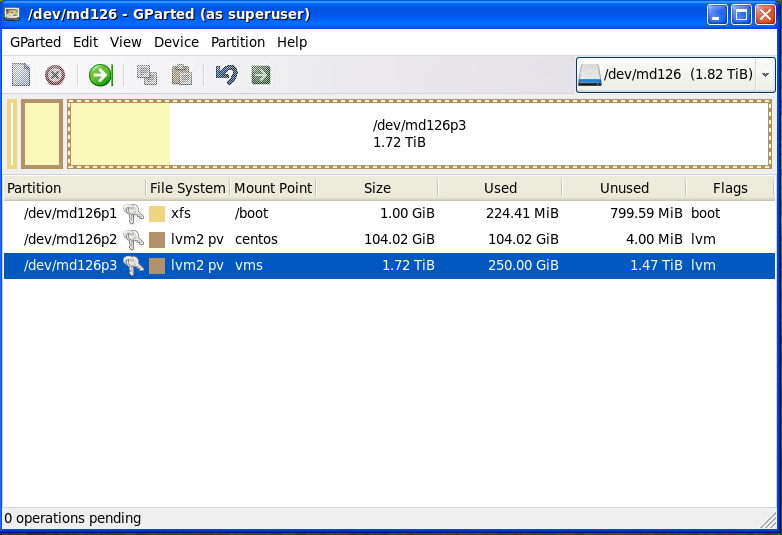
Create a new "LVM2 PV" file system based partition on the drive's remaining space like so:

Now, create the LVM volume group by using the below command and replacing /dev/md126p3 with the new partition's path label:

sudo vgcreate vms /dev/md126p3

Now, launch virt-manager by running the below command:

sudo virt-manager

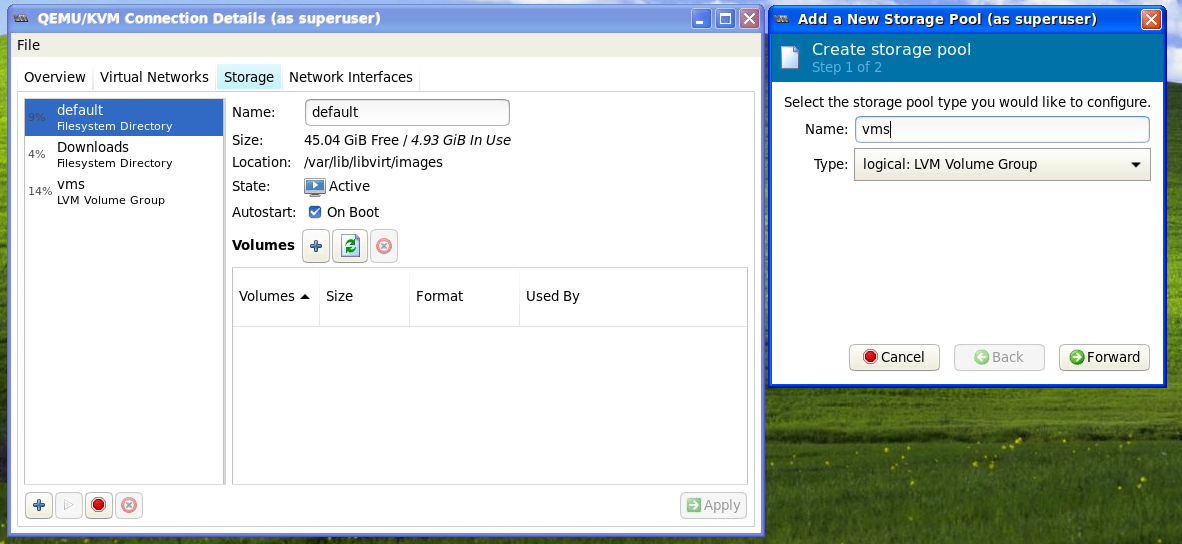
Go to "Edit" –> "Connection Details" –> click on the "Storage" tab.  Click on the "+" icon on the bottom left.  You're now creating a storage pool.  Give it a name like "vms" which is short for virtual machines.  Select "logical: LVM Volume Group" for the type.  Here's a screenshot:

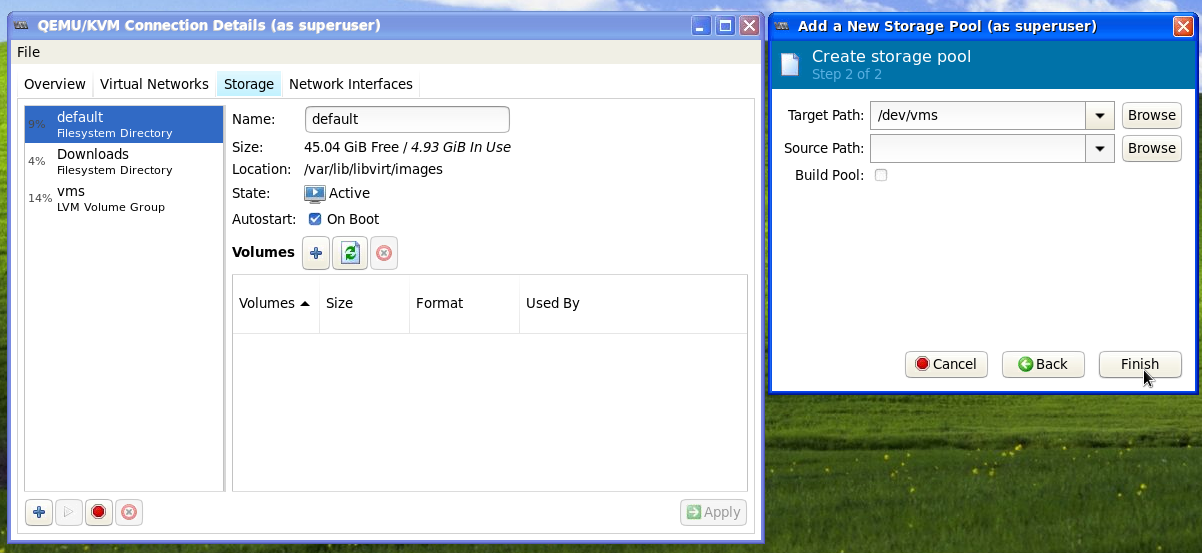
In "Target Path" select the volume group that you created named vms (which you did earlier using the "vgcreate" command).  Do NOT check the "Build Pool" checkbox, and leave the "Source Path" field blank.  Here's a screenshot of what it should look like:

Click on "Finish".  You're done, and you can now create LVM storage containers for your KVM configured pool named vms.

Here's a good LVM KVM Pool guide from RedHat that includes more information (though it's not as simple as following this guide).