Adding Custom Buttons and Plugins to WordPress' Instance of CKEditor
For CKEditor 4.x:
CKEditor 4 changed the way its toolbars work. With CKEditor 4, you can no longer create a custom toolbar group with a defined list of custom toolbar items. The developers of CKEditor claim this change was made to further innovate its editor software. I'll let you be the judge on that. Despite these changes, it is still possible to use an updated version of HTMLButtons which will add your custom toolbar buttons to the "about" toolbar group.
Before you can define and add custom buttons to CKEditor 4.x, you need to download version 1.4 of the HTMLButtons plugin. Once you've downloaded this plugin, unzip the files into a folder that you can easily find. Now, we need to edit this plugin and configure our custom buttons. Open the file "plugin.js" using a text editor such as PSPad or Notepad from the folder where you extracted the contents of the htmlbuttons plugin. Scroll down to the line that starts with:
CKEDITOR.config.htmlbuttons
You'll see three buttons defined here:
CKEDITOR.config.htmlbuttons = [
{
name:'button1',
icon:'icon1.png',
html:'<a href="http://www.google.com">Search something</a>',
title:'A link to Google'
},
{
name:'button2',
icon:'icon2.png',
html:'<table style="min-width:200px"><tr><td> </td><td> </td></tr><tr><td> </td><td> </td></tr></table>',
title:'A simple table'
},
{
name:'button3',
icon:'icon3.png',
html:'<ol><li>Item 1 <ol><li>Sub item 1</li><li>Sub item 2</li></ol></li></ol>',
title:'A nested list'
}
];
The name property of each button needs to be a unique name. I would recommend continuing the current format of "button" with a number. The icon property of each button specifies which png image should be used for the button's icon. The html property of each button is what selected text will be placed between or what html content will be added. If you want to wrap a selection into a certain HTML structure, simply define your HTML like this:
html:'<div class="customCode"><pre> </pre></div>',
Any selected text from the CKEditor instance will be wrapped within the above HTML structure. If no text is selected, the HTML structure will be inserted with new text being appended inbetween the HTML structure as desired. If "> <" isn't included in the html structure, the HTML will be appended with no text being inserted or wrapped within the structure. For example, check out one of my own button declarations:
name:'button3',
icon:'custcode.png',
html:'<div class="customCode"><pre> </pre></div>',
title:'Custom Code'
The above button declaration will insert a div and pre element into the source of my post and place the pointer inbetween the pre tags. Thus, any text that is typed once the button has been clicked will be wrapped within the div and pre elements. You can also highlight text and click the button. If you highlight text and then hit the button, the highlighted text will be automatically inserted within the div and pre opening tags and before the end tags. You can add as many buttons as you like following the template or remove as many as you wish.
Next, you'll need to upload your htmlbuttons plugin folder to the wp-content/plugins/ckeditor-for-wordpress/ckeditor/plugins/ directory. Once this has been done, open the wp-content/plugins/ckeditor-for-wordpress/ckeditor.config.js using a text editor. Under:
CKEDITOR.editorConfig = function(config) {
Add the following line:
// Added custom plugs
config.extraPlugins = 'htmlbuttons';
The basic editor definition is here:
// WordPress basic toolbar
    config.toolbar_WordpressBasic = [
        { name: 'basicstyles', groups: [ 'basicstyles', 'cleanup' ], items: [ 'Bold', 'Italic', 'Strike', '-', 'RemoveFormat' ] },
        { name: 'paragraph', groups: [ 'list', 'indent', 'blocks', 'align', 'bidi' ], items: [ 'Blockquote', '-', 'JustifyLeft', 'JustifyCenter', 'JustifyRight'] },
        { name: 'links', items: [ 'Link', 'Unlink' ] },
        { name: 'insert', items: [ 'Image', 'SpecialChar' ] }
    ];
To add your button to the basic styles group, just add the following items to the end of the basic styles definition like so (depends on how many buttons you've created of course):
{ name: 'basicstyles', groups: [ 'basicstyles', 'cleanup' ], items: [ 'Bold', 'Italic', 'Strike', '-', 'RemoveFormat', 'button1', 'button2', 'button3' ] },
Your buttons will be added to the basic editor which is seen when leaving comments. The full editor definition is a little different. It looks like this:
// The equivalent of "WordpressFull" toolbar, defined in a way that makes adding buttons from plugins easier.
    config.toolbarGroups = [
        { name: 'document',    groups: [ 'mode', 'document', 'doctools' ] },
        { name: 'clipboard',   groups: [ 'clipboard', 'undo' ] },
        { name: 'editing',     groups: [ 'find', 'selection', 'spellchecker' ] },
        // { name: 'forms' },
        '/',
        { name: 'paragraph',   groups: [ 'list', 'indent', 'blocks', 'align', 'bidi' ] },
        { name: 'links' },
        { name: 'insert' },
        { name: 'wordpress' },
        '/',
        { name: 'basicstyles', groups: [ 'basicstyles', 'cleanup' ] },
        { name: 'styles' },
        { name: 'colors' },
        { name: 'tools' },
        { name: 'about' }
    ];
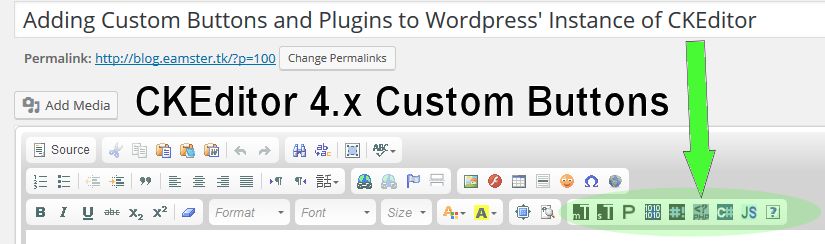
For CKEditor version 4.x, we don't need to modify this definition, as by default, all of your custom buttons will be extended onto the about toolbar group as shown in this screenshot below:
Save the file, upload it to the server, and overwrite the existing file. Clear your browser cache and relogin to WordPress. You should now see your custom buttons, and they should work when you click on them based on how you defined their behavior.
For CKEditor 3.x:
Unfortunately, there's not a lot of documentation out there on how to properly add custom buttons to WordPress' CKEditor main editor / format utility. That's about to change. Based on countless hours of searching the internet and posting on various forums, I've found the easy way to add custom buttons that perform their own functions and format certain pieces of text using custom css classes that I've defined in the main style sheet.
HTMLButtons Easy Plugin
This plugin allows you to easily create as many buttons as desired for both the full editor (the one you see when making a post on your WordPress blog) or the basic editor (the one visitors see when leaving comments). The first step is to download this plugin.
I modified this version of HTMLButtons myself, which is why it's version 1.3. (versions 1.1 and up were also released by me). Version 1.3 fixes a few bugs, keeps inline HTML formatting when modifying selected text, processes partial selections properly, and processes block selections properly. The mouse pointer location is also reset correctly to the original selection in version 1.3. When you click on your custom buttons to insert block elements, the text and HTML inline elements within the selection will be preserved. The highlighted text is appended within element tags. This is better than the initial implementation. If nothing is selected, the elements are inserted with the pointer inbetween these elements.
For more information on the original version 1.0 HTMLButtons plugin or to find out about the original author, click here.Once you've downloaded this plugin, unzip the files into a folder that you can easily find. Now, we need to edit this plugin and configure our custom buttons. Open plugin.js using a text editor such as PSPad or Notepad from the folder where you extracted the contents of htmlbuttons1.0.
Scroll down to the line that starts with:
CKEDITOR.config.htmlbuttons
You'll see three buttons defined here:
CKEDITOR.config.htmlbuttons = [
{
name:'button1',
icon:'icon1.png',
html:'<a href="http://www.google.com">Search something</a>',
title:'A link to Google'
},
{
name:'button2',
icon:'icon2.png',
html:'<table style="min-width:200px"><tr><td> </td><td> </td></tr><tr><td> </td><td> </td></tr></table>',
title:'A simple table'
},
{
name:'button3',
icon:'icon3.png',
html:'<ol><li>Item 1 <ol><li>Sub item 1</li><li>Sub item 2</li></ol></li></ol>',
title:'A nested list'
}
];
The name of each button is how we will reference it when adding it to the full and basic editor. Icon specifies which picture should be displayed for the button. Button icons should be 15 pixels by 15 pixels. You can create custom icons using an image editor. HTML specifies what should be inserted to the actual source of your post when clicked on. It will automatically insert text within this statement. As an example, check out one of my own button declarations:
name:'button3',
icon:'custcode.png',
html:'<div class="customCode"><pre> </pre></div>',
title:'Custom Code'
The above button declaration will insert a div and pre element into the source of my post and place the pointer inbetween the pre tags. Thus, any text that is typed once the button has been clicked will be wrapped within the div and pre elements. You can also highlight text and click the button. If you highlight text and then hit the button, the highlighted text will be automatically inserted within the div and pre opening tags and before the end tags. You can add as many buttons as you like following the template or remove as many as you wish.Next, you'll need to upload your htmlbuttons plugin folder to the wp-content/plugins/ckeditor-for-wordpress/ckeditor/plugins/ directory. Once this has been done, open the wp-content/plugins/ckeditor-for-wordpress/ckeditor.config.js using a text editor.
Under:
CKEDITOR.editorConfig = function(config) {
Add the following line:
// Added custom plugs
config.extraPlugins = 'htmlbuttons';
The basic editor definition is here:
// WordPress basic toolbar
    config.toolbar_WordpressBasic = [
        { name: 'basicstyles', groups: [ 'basicstyles', 'cleanup' ], items: [ 'Bold', 'Italic', 'Strike', '-', 'RemoveFormat' ] },
        { name: 'paragraph', groups: [ 'list', 'indent', 'blocks', 'align', 'bidi' ], items: [ 'Blockquote', '-', 'JustifyLeft', 'JustifyCenter', 'JustifyRight'] },
        { name: 'links', items: [ 'Link', 'Unlink' ] },
        { name: 'insert', items: [ 'Image', 'SpecialChar' ] }
    ];
To add your button to the basic styles group, just add the following items to the end of the basic styles definition like so (depends on how many buttons you've created of course):
{ name: 'basicstyles', groups: [ 'basicstyles', 'cleanup' ], items: [ 'Bold', 'Italic', 'Strike', '-', 'RemoveFormat', 'button1', 'button2', 'button3' ] },
Your buttons will be added to the basic editor which is seen when leaving comments.The full editor definition is a little different. Here's what it looks like by default:
// The equivalent of "WordpressFull" toolbar, defined in a way that makes adding buttons from plugins easier.
    config.toolbarGroups = [
        { name: 'document',    groups: [ 'mode', 'document', 'doctools' ] },
        { name: 'clipboard',   groups: [ 'clipboard', 'undo' ] },
        { name: 'editing',     groups: [ 'find', 'selection', 'spellchecker' ] },
        // { name: 'forms' },
        '/',
        { name: 'paragraph',   groups: [ 'list', 'indent', 'blocks', 'align' ] },
        { name: 'links' },
        { name: 'insert' },
        { name: 'wordpress' },
        '/',
        { name: 'basicstyles', groups: [ 'basicstyles', 'cleanup' ] },
        { name: 'styles' },
        { name: 'colors' },
        { name: 'tools' },
        { name: 'about' }
    ];
Depending on where you want to add your custom buttons, you'll need to create a new group with its own name and items definition that will be added to the list. I wanted my buttons before the bold, italics, and underline buttons, so I added my declaration here:
{ name: 'wordpress' },
'/',
{ name: 'custom', items: [ 'button1', 'button2', 'button3' ] },
{ name: 'basicstyles', groups: [ 'basicstyles', 'cleanup' ] },
This will insert our custom buttons before the basicstyles controls in the full editor (the one you see when making a new post / blog)
You're done. Here's what my full ckeditor.config.js file contains:
/*
Copyright (c) 2003-2010, CKSource - Frederico Knabben. All rights reserved.
For licensing, see LICENSE.html or http://ckeditor.com/license
*//**
 * Documentation:
 * http://docs.cksource.com/ckeditor_api/symbols/CKEDITOR.config.html
 */CKEDITOR.editorConfig = function(config) {  // Added custom plugs
  config.extraPlugins = 'htmlbuttons';          // The minimum editor width, in pixels, when resizing it with the resize handle.
    config.resize_minWidth = 450;

    // Protect PHP code tags (<?...?>) so CKEditor will not break them when
    // switching from Source to WYSIWYG.
    config.protectedSource.push(/<\?[\s\S]*?\?>/g);    // Define toolbars, you can remove or add buttons.
    // List of all buttons is here: http://docs.cksource.com/ckeditor_api/symbols/CKEDITOR.config.html#.toolbar_Full    // WordPress basic toolbar
    config.toolbar_WordpressBasic = [
        { name: 'basicstyles', groups: [ 'basicstyles', 'cleanup' ], items: [ 'Bold', 'Italic', 'Strike', '-', 'RemoveFormat', 'button1', 'button2', 'button3' ] },
        { name: 'paragraph', groups: [ 'list', 'indent', 'blocks', 'align', 'bidi' ], items: [ 'Blockquote', '-', 'JustifyLeft', 'JustifyCenter', 'JustifyRight'] },
        { name: 'links', items: [ 'Link', 'Unlink' ] },
        { name: 'insert', items: [ 'Image', 'SpecialChar' ] }
    ];    // The equivalent of "WordpressFull" toolbar, defined in a way that makes adding buttons from plugins easier.
    config.toolbarGroups = [
        { name: 'document',    groups: [ 'mode', 'document', 'doctools' ] },
        { name: 'clipboard',   groups: [ 'clipboard', 'undo' ] },
        { name: 'editing',     groups: [ 'find', 'selection', 'spellchecker' ] },
        // { name: 'forms' },
        '/',
        { name: 'paragraph',   groups: [ 'list', 'indent', 'blocks', 'align' ] },
        { name: 'links' },
        { name: 'insert' },
        { name: 'wordpress' },
        '/',
    { name: 'custom', items: [ 'button1', 'button2', 'button3' ] },
        { name: 'basicstyles', groups: [ 'basicstyles', 'cleanup' ] },
        { name: 'styles' },
        { name: 'colors' },
        { name: 'tools' },
        { name: 'about' }
    ];    // Remove buttons in "WordpressFull" toolbar
    config.WordpressFull_removeButtons = 'Save,NewPage,Preview,Print,Templates,CreateDiv,PageBreak,Subscript,Superscript,Styles';    //IE: remove border of image when is as a link
    config.extraCss = "a img { border: 0px\\9; }";

    // mediaembed plugin
    // config.extraPlugins += (config.extraPlugins ? ',mediaembed' : 'mediaembed' );
    // CKEDITOR.plugins.addExternal('mediaembed', ckeditorSettings.pluginPath + 'plugins/mediaembed/');
};
That's all you need to edit. Save the file, upload it to the server, and overwrite the existing file. You should now see your custom buttons, and they should work when you click on them based on how you defined their behavior.
What does your button do from your example?
My button allows me to create html code that is formatted using a class I defined in the wp-content/themes/[current theme you’re using]/style.css stylesheet. The class of customCode has the following definition:
div.customCode {padding:5px; background-color: #ecfef0; font-family: 'arial'; font-style: italic; color: black; font-size: 17px; margin-top: 1em; margin-bottom: 1em; overflow: auto;}
Thus, when the button is clicked, I have inserted custom code into the source of the post that will format the text exactly as I have defined. This is a great shortcut to be able to make my blog posts look exactly how I want them to look.
My End Product:

