Dual Boot Linux (Ubuntu 22.04) and Windows 11 on Modern Systems – UEFI

Thursday, December 7th, 2023

Dual Boot Linux (Ubuntu 22.04) and Windows 11 on Modern Systems – UEFI

In order to setup a dual boot of Windows 11 and Ubuntu 22.04 on a modern system that uses UEFI, follow these steps.

  1. Install Windows 11 first leaving some unpartitioned space (at least 60GB is my recommendation) on the drive you're installing Windows on.
  2. Boot up the Ubuntu installer.
  3. During installation, you'll be presented with an Installation Type options screen.  Choose "Something else". 
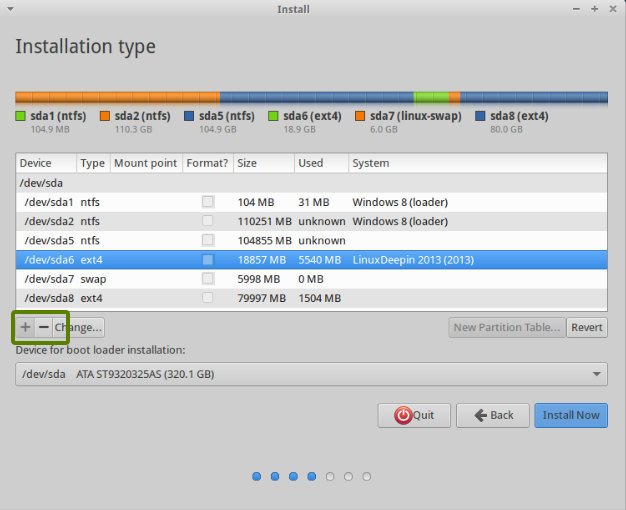
  4. On the next screen, you'll see a list of drives and partitions.  On the same drive you installed Windows, create 3 new partitions. 
    1. Create an EXT4 partition for the / mount point at least 40GB in size (this is the main drive for Linux files).
    2. Create a SWAP partition at least 18GB in size.
    3. Create an EFI partition at least 500MB in size.  This is extremely important in order to get grub to install properly. 
  5. Leave the "Device for boot loader installation" set as the top level drive that Windows and Ubuntu was / is being installed on.  You should not select an individual partition here.
  6. Complete the installation process. 
  7. You might need to change the UEFI boot order in the BIOS of your system to boot Ubuntu / Linux first versus booting the Windows EFI partition.  Since you created an EFI partition for your Linux install, it should show up as a bootable option in the bios.  Set / adjust accordingly.
  8. That's it!

Adding SAS RAID Drivers to CentOS 8 and Red Hat Linux During Installation

Friday, April 30th, 2021

Adding SAS RAID Drivers to CentOS 8 and Red Hat Linux During Installation

CentOS 8 and Red Hat Linux 8 removed a lot of built in RAID controller and SAS drivers.  As such, you'll need to identify your SAS RAID controller card model number, and then during the installation of CentOS 8 or Red Hat, you will need to follow these instructions (modifying them for your hardware).

https://gainanov.pro/eng-blog/linux/rhel8-install-to-dell-raid/

If for some reason the link above is no longer available, I saved and archived a copy which can be read here.

Add El Repo Permanently

As updates are released to CentOS 8 / Rocky Linux / Red Hat 8, the kernel will often be upgraded.  To make sure the SAS drives are updated as well, you'll need to configure your system to pull updates from El Repo automatically by using the following commands:

sudo rpm --import https://www.elrepo.org/RPM-GPG-KEY-elrepo.org
sudo yum install https://www.elrepo.org/elrepo-release-8.el8.elrepo.noarch.rpm
sudo yum update -y

In case the above instructions no longer work, this guide should help.

Disable NetworkManager Wait Online Service

Prevent the boot from being halted on startup by network connection checks by running the below command:

sudo systemctl mask NetworkManager-wait-online.service

Debian & Ubuntu :: Suppress Installation Package Prompts Completely or Preconfigure Prompt Answers

Saturday, September 14th, 2013

Suppress Installation Package Prompts Completely or Preconfigure Installation Question Answers

Automating the installation of software via bash scripting on Linux can be difficult.  However, in debian and its related distributions such as Ubuntu, you can simplify the installation of packages by using a few tools.  One of these tools is called debconf-utils.  If installation packages such as MySQL or PHPMyAdmin ask configuration questions, you can provide a default set of answers without being prompted.  This is excellent for testing scripts or automating installation for users who may not know how to appropriately answer these questions.

Basically, with debconf-utils you can pre-answer these questions so that no prompts show up!

To install, run this command:

sudo apt-get install debconf-utils

To get a list of questions an installer might ask, first install the package on a test machine where you're writing the script normally.  For example, let's install phpmyadmin:

sudo apt-get install phpmyadmin

Now, to retrieve a set of questions phpmyadmin may ask, you can run this command:

sudo debconf-get-selections | grep phpmyadmin

In your bash script, you can now pre-answer certain questions by including your preconfigured answer commands before installing the package.  For example, when phpmyadmin installs, it asks for the MySQL root user password.  You can skip this prompt and define what the MySQL root password should be by using this command in your script:

echo 'phpmyadmin phpmyadmin/mysql/admin-pass password 1234' | debconf-set-selections

password defines the type and 1234 sets the password to 1234.
You can also suppress questions entirely by using the following command in front of your install command:

DEBIAN_FRONTEND=noninteractive sudo apt-get install phpmyadmin

Default configuration will be used during the installation of the phpmyadmin package, which means it may not work after being installed because some configuration options should be answered.  So, use both combinations for various packages to fit your needs!

WinRar SFX Custom Start In and Target Paths on Desktop Shortcuts

Saturday, January 19th, 2013

WinRar SFX Custom Start In and Target Paths

When creating a self extracting installation wizard using WinRar, you may want to create a shortcut to your program on the user's desktop.  Typically, these parameters are specified in the "SFX options…" dialog.  In the "Advanced SFX options", click on the "Advanced" tab.  Here, you'll see a section called "Shortcuts".  If you create a shortcut using the "Add shortcut…" button, WinRAR will typically leave out an important undocumented feature.

If you create a desktop shortcut using the "Add shortcut…" button, make sure you set the "Destination folder" to just a slash "\" (no quotes) or the shortcut on the desktop will have the following properties:

Target: "D:\Install Directory\YourProgram.exe"
Start in:

Notice, there is no "Start in:" path.  To fix this, you need to add a "\" to the desktop shortcut parameters manually like so:

D, yourProgramsName.exe, \, "Shortcut Description", "Shortcut name",

Or, make sure you place a "\" (no quotes) for the "Destination folder" in the add shortcut helper.

This problem only affects desktop shortcuts and can be fixed by adding a "\" to the parameters for each desktop shortcut after the program's name.

Best Way to Find and Install Prerequisites

Thursday, March 29th, 2012

Find and Install Software Prerequisites for Ubuntu

Sometimes, you get stuck having to manually compile and install software, as no package is available for your Ubuntu distribution or one of the package sources has become broken.  However, you should check the link below and search for the software you're looking for, as there MAY already be a pre-existing package for your version of Ubuntu.  Typically, you download a software package, read the ReadMe, and are left asking, why doesn't this prerequisite package exist for installation?  I've got the names right here!  Unfortunately, each version of Linux can name their packages differently.  As a result, there's a lot of confusion.  However, say the ReadMe prompts you to install nfnetlink development packages.  Great, so you try:

sudo apt-get install nfnetlink-dev

Only… the package doesn't exist.  What do you do now?  Rather than searching the internet, search ubuntu's packages by clicking on the below link:

Search Ubuntu Packages

Once you're on that page, scroll down to the "Search" section.  Type in the name of the package you were given.  In our example, it was nfnetlink and click on "Search".  The first package listed is libnfnetlink-dev.  This is exactly what we were looking for!  So install it doing this:

sudo apt-get install libnfnetlink-dev

Repeat the process to locate the remaining missing packages.

Once all of your prerequisites have been installed, you should be able to successfully compile and install whatever software package you're trying to install.