Dual Boot Linux (Ubuntu 22.04) and Windows 11 on Modern Systems – UEFI

Thursday, December 7th, 2023

Dual Boot Linux (Ubuntu 22.04) and Windows 11 on Modern Systems – UEFI

In order to setup a dual boot of Windows 11 and Ubuntu 22.04 on a modern system that uses UEFI, follow these steps.

  1. Install Windows 11 first leaving some unpartitioned space (at least 60GB is my recommendation) on the drive you're installing Windows on.
  2. Boot up the Ubuntu installer.
  3. During installation, you'll be presented with an Installation Type options screen.  Choose "Something else". 
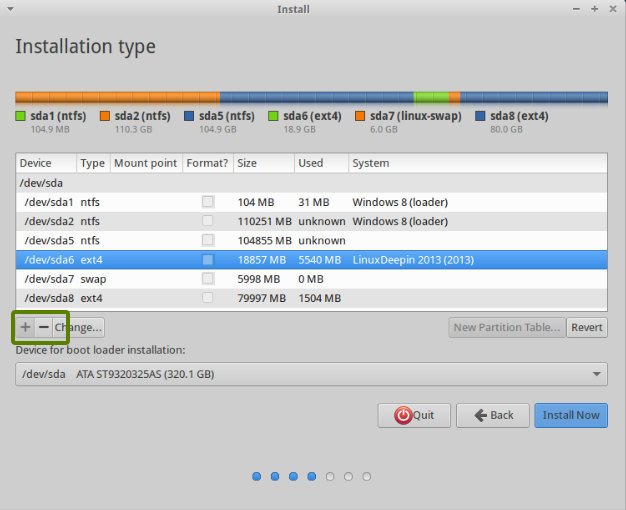
  4. On the next screen, you'll see a list of drives and partitions.  On the same drive you installed Windows, create 3 new partitions. 
    1. Create an EXT4 partition for the / mount point at least 40GB in size (this is the main drive for Linux files).
    2. Create a SWAP partition at least 18GB in size.
    3. Create an EFI partition at least 500MB in size.  This is extremely important in order to get grub to install properly. 
  5. Leave the "Device for boot loader installation" set as the top level drive that Windows and Ubuntu was / is being installed on.  You should not select an individual partition here.
  6. Complete the installation process. 
  7. You might need to change the UEFI boot order in the BIOS of your system to boot Ubuntu / Linux first versus booting the Windows EFI partition.  Since you created an EFI partition for your Linux install, it should show up as a bootable option in the bios.  Set / adjust accordingly.
  8. That's it!

Fix for Older SSH Keys Not Working on Newer Versions of Debian / Ubuntu

Thursday, May 25th, 2023

Fix for SSH Keys Not Working on Newer Versions of Debian / Ubuntu

If your old SSH keys are not working on newer versions of Ubuntu / Debian, and you're being prompted to login (~/.ssh/config configuration being ignored), the fix is to add the following line to the bottom of the /etc/ssh/ssh_config file:

    PubkeyAcceptedKeyTypes +ssh-rsa

That's it.  It will work again.  You may need to restart the ssh service

sudo service ssh restart

https://askubuntu.com/questions/1404049/ssh-without-password-does-not-work-after-upgrading-from-18-04-to-22-04

cURL and wget Issues on Ubuntu 16.04 – SSL: TLSV1_ALERT_PROTOCOL_VERSION

Monday, December 5th, 2022

cURL and wget Issues on Ubuntu 16.04

When using wget or curl to make HTTP requests from a no longer supported installation of Ubuntu 16.04 Xenial, if you get any of the following errors:

curl gnutls_handshake() failed: Error in protocol version
curl: (35) error:1407742E:SSL routines:SSL23_GET_SERVER_HELLO:tlsv1 alert protocol version  /home/mohan/mesg
[SSL: TLSV1_ALERT_PROTOCOL_VERSION] tlsv1 alert protocol version (_ssl.c:727) 

The solution is to add SavOS Rob Savoury PPAs to get updated curl and wget packages:

sudo add-apt-repository ppa:savoury1/build-tools
sudo add-apt-repository ppa:savoury1/backports
sudo add-apt-repository ppa:savoury1/python
sudo add-apt-repository ppa:savoury1/encryption
sudo add-apt-repository ppa:savoury1/curl34
sudo apt-get update && sudo apt-get upgrade
sudo apt-get install wget curl python2.7

Ubuntu: Allow Automatic Updates for Specific Packages Only

Tuesday, June 14th, 2022

Ubuntu: Allow Automatic Updates for Specific Packages Only

If you want to allow Google products and packages to update automatically, follow this guide.

You can also add additional sources that should update automatically following the same process.

This is helpful when using Selenium, WebDriver for Chrome, and Python.  Doing this allows you to always use the most up-to-date version of all of these dependent packages.

Tested in Ubuntu 20.04

Fixing Sound in Ubuntu

Wednesday, April 21st, 2021

Fixing Sound in Ubuntu

If your sound quits working randomly after installing updates via the apt system (via sudo apt-get update && apt-get upgrade) or via the Software & Updates graphical program, it's possible that some of the drivers have not been installed with the latest kernel updates.

To fix this, try running the below command:

sudo apt install linux-modules-extra-$(uname -r)

Reboot.  Your sound should hopefully work again!

If the above command doesn't work (older versions of Ubuntu do not have this package), please see the generic information here:

https://itsfoss.com/how-to-fix-no-sound-through-hdmi-in-external-monitor-in-ubuntu/

Intel Original Compute Stick – Keep WiFi from Breaking – Block Kernel Updates and Chestersmill-Settings Updates – Get Latest Software from Ubuntu Advantage

Wednesday, April 21st, 2021

Intel Original Compute Stick – Keep WiFi from Breaking – Block Kernel Updates and Chestersmill-Settings Updates

If you have the original Intel Compute Stick (STCK1A8LFC [1GB of RAM] or STCK1A32WFC [2GB of RAM] models from 2015), you'll need to prevent a few software packages from updating so that these updates won't break your WiFi!  I've never been able to get the WiFi to work with these Intel Compute Sticks running a kernel newer than version 3.16 on any version of Ubuntu.  I've also never been able to get the WiFi to work on anything but Ubuntu 14.04, so you might be stuck having to run this older version of Ubuntu.  Also, updates to the chestersmill-settings package can break your WiFi.  To prevent both scenarios from breaking your WiFi, simply prevent the below packages from being updated.

Preventing packages from being updated can be accomplished using hold statuses in the apt system as explained on AskUbuntu:

https://askubuntu.com/questions/18654/how-to-prevent-updating-of-a-specific-package

Basically, you'll need to run the below commands to prevent WiFi from breaking due to buggy kernel and chestersmill-settings package updates:

sudo apt-mark hold chestersmill-settings
sudo apt-mark hold linux-image-$(uname -r)
sudo apt-mark hold linux-image-generic
sudo apt-mark hold linux-generic

You can now safely update software packages without worrying about your WiFi being broken by kernel and chestersmill-settings package updates!

Get Latest Software from Ubuntu Advantage for Ubuntu 14.04

Ubuntu 14.04 is also still supported via the Extended Security Maintenance (ESM) Ubuntu Advantage program (https://ubuntu.com/advantage).  

To get updated software and packages until April of 2022, you'll need to get an Ubuntu Advantage key.  Get your key using your UbuntuOne account on this page:  https://ubuntu.com/advantage

Now, install the Ubuntu advantage client by using the commands below:

sudo add-apt-repository ppa:ua-client/stable
sudo apt-get update
sudo apt-get install ubuntu-advantage-tools

Set your key using the command below (using your key rather than YOUR_KEY_HERE):

sudo ua attach YOUR_KEY_HERE

Now update and install the upgraded packages available via Ubuntu Advantage:

sudo apt-get update && sudo apt-get upgrade

Installing the Newest Version of Python 2.7.x on Older Versions of Ubuntu (like 14.04 and 16.04)

Thursday, May 9th, 2019

Installing the Newest Version of Python 2.7.x on Older Ubuntu Systems

If you need to upgrade to the newest version of Python 2.7.x, and you're running an older distribution (like Ubuntu 14.04), use the following commands to get and compile the latest version from source (works on Ubuntu 17.04 and older – tested on Ubuntu 14.04):

sudo apt-get install build-essential checkinstall
sudo apt-get install libreadline-gplv2-dev libncursesw5-dev libssl-dev libsqlite3-dev tk-dev libgdbm-dev libc6-dev libbz2-dev
version=2.7.18
cd ~/Downloads/
wget https://www.python.org/ftp/python/$version/Python-$version.tgz
tar -xvf Python-$version.tgz
cd Python-$version
./configure --with-ensurepip=install
make
sudo make install

Install requests and hashlib:

sudo rm /usr/lib/python2.7/dist-packages/chardet*.egg-info
sudo rm -r /usr/lib/python2.7/dist-packages/chardet
sudo rm /usr/lib/python2.7/lib-dynload/_hashlib.x86_64-linux-gnu.so
sudo rm /usr/lib/python2.7/lib-dynload/_hashlib.i386-linux-gnu.so
sudo pip install requests
sudo easy_install hashlib

You may need to create a symlink for chardet after installing it directly from pip:

ln -sf /usr/local/lib/python2.7/site-packages/chardet /usr/lib/python2.7/dist-packages/chardet

If you get the error of "ImportError: cannot import name _remove_dead_weakref" when running a pam python based authentication script after installing the new version of python, try this fix:

sudo cp /usr/local/lib/python2.7/weakref.py /usr/local/lib/python2.7/weakref_old.py
sudo cp /usr/lib/python2.7/weakref.py /usr/local/lib/python2.7/weakref.py

Getting Let's Encrypt Certbot to Work:

Now, you'll need to delete the EFF directory from the /opt directory to avoid old configuration issues that were used for your older version of python.  Once you cleanup this directory, you'll run certbot again so it can reconfigure itself. 

sudo rm -r /opt/eff.org/
sudo certbot

Old Way

jonathonf is now a very greedy person and has made his repositories private, so this method no longer works as of 12/20/2019.

sudo add-apt-repository ppa:jonathonf/python-2.7
sudo apt-get update
sudo apt-get install python2.7

Then, you'll need to cleanup a few leftover system packages manually before installing the newest version of python-pip.  If you don't do this, you'll run into problems installing some new packages using pip.

sudo rm /usr/lib/python2.7/dist-packages/chardet*.egg-info
sudo rm -r /usr/lib/python2.7/dist-packages/chardet
sudo rm /usr/lib/python2.7/lib-dynload/_hashlib.x86_64-linux-gnu.so
sudo rm /usr/lib/python2.7/lib-dynload/_hashlib.i386-linux-gnu.so

Now, you can download and install the newest version of python-pip:

curl https://bootstrap.pypa.io/get-pip.py -o get-pip.py
sudo python get-pip.py

Getting Let's Encrypt Certbot to Work:

First, you'll need to install a few packages that Certbot (the Let's Encrypt client) uses:

sudo pip install requests
sudo pip install hmac

Now, you'll need to delete the EFF directory from the /opt directory to avoid old configuration issues that were used for your older version of python.  Once you cleanup this directory, you'll run certbot again so it can reconfigure itself. 

sudo rm -r /opt/eff.org/
sudo certbot

You're done.

Full list of commands (for quickly doing all of the above):

sudo -i
add-apt-repository ppa:jonathonf/python-2.7
apt-get update
apt-get install python2.7
rm /usr/lib/python2.7/dist-packages/chardet*.egg-info
rm -r /usr/lib/python2.7/dist-packages/chardet
rm /usr/lib/python2.7/lib-dynload/_hashlib.x86_64-linux-gnu.so
rm /usr/lib/python2.7/lib-dynload/_hashlib.i386-linux-gnu.so
mkdir -p /root/Downloads
cd /root/Downloads
curl https://bootstrap.pypa.io/get-pip.py -o get-pip.py
python get-pip.py
pip install requests
pip install hmac
rm -r /opt/eff.org/
certbot

Change the Default Editor to nano in Linux

Saturday, April 27th, 2019

Use nano as the Default Editor

If you hate vi like I do, you can configure Linux to always default to using the nano editor.

Simply add the following to the bottom of the /etc/bashrc file:

export EDITOR="nano"

Save the file.  nano is now the default editor.  When you use

sudo crontab -e

The nano editor will now be used by default.

Full Ubuntu Startup Applications Location List

Saturday, December 8th, 2018

Location of Ubuntu Startup Application Scripts

All Versions of Ubuntu

In all versions of Ubuntu, startup scripts can be configured and run from the following locations:

/etc/init/*.conf – some init scripts
/etc/rc.local – a file that is run by root on system boot (bash scritps and other commands can go in here)
~/.config/autostart – user specific GUI programs that are run once the X11 environment is started
/etc/xdg/autostart – Global GUI programs that are run once the X11 environment is started
@reboot cronjob – cronjob scripts that are executed when the system boots

Ubuntu 16.04 and Later

systemd init scripts in /etc/systemd/system/*.service files
systemd init scripts in /lib/systemd/system/*.service files

Get the Source Code and Modify an Ubuntu Package

Tuesday, October 6th, 2015

Modifiying the Source of a Package and Creating a New Deb Binary

In order to download the source code of an existing package, first install the prerequisites:

sudo apt-get install build-essential debhelper

To get the source code of a package, run the following command:

apt-get source {name_of_package_interested_in}

Make changes to the source using an editor like geany or via terminal through nano.  Edit the changelog file and add a record of your changes to build a new revision number.  After you have made the changes, run the following commands to build the package which should include your changes.

dpkg-source --commit
dpkg-buildpackage -b

The updated package has been built.  To install the package, simply use the below commands:

sudo dpkg --install {name_of_new_deb_file}

To remove the software:

sudo dpkg -r {name_of_package [NOT NAME OF DEB FILE]}

Now you can release it!