Archive for the ‘Windows’ Category

Dual Boot Linux (Ubuntu 22.04) and Windows 11 on Modern Systems – UEFI

Thursday, December 7th, 2023

Dual Boot Linux (Ubuntu 22.04) and Windows 11 on Modern Systems – UEFI

In order to setup a dual boot of Windows 11 and Ubuntu 22.04 on a modern system that uses UEFI, follow these steps.

  1. Install Windows 11 first leaving some unpartitioned space (at least 60GB is my recommendation) on the drive you're installing Windows on.
  2. Boot up the Ubuntu installer.
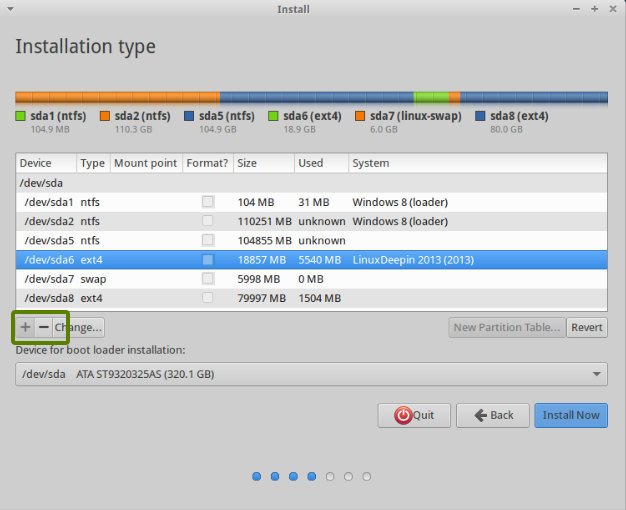
  3. During installation, you'll be presented with an Installation Type options screen.  Choose "Something else". 
  4. On the next screen, you'll see a list of drives and partitions.  On the same drive you installed Windows, create 3 new partitions. 
    1. Create an EXT4 partition for the / mount point at least 40GB in size (this is the main drive for Linux files).
    2. Create a SWAP partition at least 18GB in size.
    3. Create an EFI partition at least 500MB in size.  This is extremely important in order to get grub to install properly. 
  5. Leave the "Device for boot loader installation" set as the top level drive that Windows and Ubuntu was / is being installed on.  You should not select an individual partition here.
  6. Complete the installation process. 
  7. You might need to change the UEFI boot order in the BIOS of your system to boot Ubuntu / Linux first versus booting the Windows EFI partition.  Since you created an EFI partition for your Linux install, it should show up as a bootable option in the bios.  Set / adjust accordingly.
  8. That's it!

Creating SSL PFX Certificate for IIS Windows

Thursday, December 7th, 2023

Creating SSL PFX Certificate for IIS Windows

To create a PFX certificate file you can import into IIS on Windows from an openssl private key and certificate file on Linux, use the below command:

openssl pkcs12 -export -legacy -out iis_certificate.pfx -inkey your_private_key.key -in your_cert.crt -certfile your_chain.crt


Restoring Areca Backups

Friday, October 20th, 2023

Restoring Areca Backups

The first step to restoring an Areca backup image is to map the network drives as they were on the computer you made the backup from (if you were using network drives to store the backup).  If you can't remember how the network drives were initially configured or mapped, proceed to the next step, and Areca will eventually tell you which drive is missing.  Once the drives have been remapped as before, and if the backup file is no longer stored on that mapped drive, copy your Areca backup folder (for example, in my case, the folder named 1878606550) to the backup drive location.   

In order to restore an Areca backup archive onto another computer, you need to copy the bcfg file located in the areca_config_backup folder to the Areca workspace directory on the computer you're attempting to restore the files on.  Once you've done that, you can restart Areca, and you'll be prompted to provide the encryption key.  Enter it here.

Assuming the drives exist as they did on the previous computer and the backup folder exists where the backups were being stored, you should be able to view the files within the Archives tab.  Right click on the backup and choose "Recover".  Follow this wizard, and the files will be unencrypted and extracted.   

Fix for Older SSH Keys Not Working on Windows Git

Friday, September 22nd, 2023

Fix for Older SSH Keys Not Working on Windows Git

If your old SSH keys are not working on Windows after installing the latest Git client and tools, and you're being prompted to login (~/.ssh/config configuration being ignored), the fix is to add the following line to the bottom of the C:\Program Files\Git\etc\ssh\ssh_config file:

Host *
	PubkeyAcceptedKeyTypes +ssh-rsa

That's it.  It will work again. 

Similar fix for Linux: https://blog.eamster.tk/fix-for-ssh-keys-not-working-on-newer-versions-of-debian-ubuntu/

Areca Backup – Getting it to Work in Windows 10 / 11 64-bit

Saturday, March 4th, 2023

Getting Areca Backup to Work on Modern Systems

Unfortunately, Areca Backup hasn't been updated since 2015.  But, it still works great, and it's an awesome program that can compress and encrypt files into a backup archive that can be transferred to a NAS drive or uploaded to the cloud.  However, getting it to work on a modern system can be a chore.  After installing Areca Backup, when you try to launch the application, if nothing happens, you will need to perform both of the following fixes:

Install 32-bit Java first [Windows Offline], and then install 64-bit Java second [Windows Offline (64-bit)] if you have a 64-bit operating system.  Without the 64-bit version of Java, Areca will not launch on a 64-bit system.

The next step to getting Areca to run is to replace the "swt.jar" file in the lib folder found in the installation directory (default is C:\Program Files (x86)\Areca\) with this one:  http://dinofly.com/files/swt.zip

Once the original swt.jar file has been replaced in C:\Program Files (x86)\Areca\lib with the one linked above, Areca will now open and run properly.

Tested on Windows 7 x64, Windows 10 x64, and Windows 11 x64.

Blackbird – Windows Privacy, Security, and Performance

Saturday, December 12th, 2020

Blackbird for Windows (7, 8, and 10)

When it comes to Windows, getting rid of telemetry, keyloggers, and other spyware Microsoft has embedded in your operating system can be rather difficult.  Fortunately, there are a few utilities that can help you take back control over your privacy and security.  One of these utilities is Blackbird, and it is now my preferred privacy and security utility for removing the Microsoft bloatware and spyware that Microsoft has embedded in their latest versions of Windows (Windows 7, Windows 8, and Windows 10). 

To use Blackbird, simply download and run the latest version from their site:

https://www.getblackbird.net/

If for some reason you can't download it from their official site, you can download the latest version from this mirror.

Fix for Mapped Network Drive Issues

After running Blackbird and using it to remove Microsoft's embedded spyware, your mapped network drives to your Network Attached Storage (NAS) drives may no longer work or load properly.  To fix this, download and extract this zip file (named blackbird_fix_smb1_nas_drives.zip) into the same directory where you unzipped the blackbird.exe file.  Then, double click on the "blackbird-network-issues-fix-including-smbv1.bat" file which will run scripts to fix your Server Message Block Version 1 (SMB1) settings.  Reboot your computer after running the batch file, and your NAS drives should work again.

Destroy Windows Spying

I used to use Destroy Windows Spying, but unfortunately, it hasn't been updated in a long time and is no longer being actively developed or maintained, and as such, Blackbird is now my preferred destroy windows spying utility!

Recreating a Lost or Removed EFI Windows Boot Partition (Repair Windows Boot)

Wednesday, January 29th, 2020

Recreating a Lost or Removed EFI Windows Boot Partition

In case you remove an SSD with a Windows Boot Partition that boots an installation of Windows, you'll need to recreate the boot system to be able to successfully boot again.  To recreate the boot EFI partition on another drive or partition, perform the following:

1) Create or use an existing Windows installation disc or flash drive (you can use Rufus USB to format a flash drive with a Windows ISO)
2) Boot PC using your Windows installation media (a CD, DVD, flash drive, etc containing Windows installation files)
3) Press SHIFT + F10 on the first screen to bring up Command Prompt
4) Run the following commands and click Enter each time at Command Prompt:

diskpart
list disk
select disk N (N refers to the disk which contains the deleted the EFI System partition)
list partition
create partition efi size=200
format quick fs=fat32
list partition
list volume (find the volume letter which belongs to the installed Windows OS)
exit (exit diskpart)
bcdboot M:\windows (M refers to the volume letter of installed Windows OS)

Add any additional Windows installations by repeating the bcdboot command followed by the installation path for any other Windows installations you want added to the menu.  For example, I added my Windows 7 partition using the below command:

bcdboot P:\windows

You should now be able to boot Windows again without needing the old boot partition or drive.

Instructions were modified from this post.

Ryzen Windows 10 Random BSOD Fix – Mouse Becomes Unresponsive, System Slows to a Crawl, and Then Crashes

Tuesday, January 28th, 2020

Ryzen Windows 10 Random BSOD Fix

For the longest time, I could not figure out why I couldn't get Windows 10 to consistently install or run in a stable fashion for longer than a few minutes on my Ryzen 1700X or my Ryzen 3900X AMD CPU. 

After trying everything I could think of and pulling my hair out, I found a simple solution that appears to have worked!  Simply disable Link State Power Management in your Power Setting's active power plan.

Go to the "Control Panel" -> "Power Options" -> Click on the "Change plan settings" link for your selected power plan -> click on the "Change advanced power settings" link -> navigate to the "PCI Express" category -> find the "Link State Power Management" option -> set it to "Off" (for both on battery and plugged in).

In general, there are several reasons why a computer can suffer a catastrophic Blue Screen of Death (BSOD) issue, but in my case, it turns out I just needed to adjust some power settings to compensate for a storage controller bug found in some solid state hard drives.  Thanks Reddit users for helping me find the fix!

https://www.reddit.com/r/Amd/comments/cx3rpb/new_system_with_ryzen_and_windows_10_freezes/#t1_eykk63l

Run Everything as an Administrator in Windows 10 by Default – Same Windows 7 Behavior

Tuesday, January 28th, 2020

Run Everything as an Administrator in Windows 10 by Default – Same Windows 7 Behavior

To run everything as an administrator in Windows 10, there are several settings that must be changed.  In Windows 7, you would only have to disable UAC for the current user:

This isn't good enough in Windows 10.  You have to disable UAC for the current user AND do the following:

Run gpedit.msc to open the Local Group Policy Editor. Expand Computer Configuration, Windows Settings, Security Settings, Local Policies, and Security Options. Four settings need to be updated:

  1. Set "User Account Control: Behavior of the elevation prompt for administrators in Admin Approval Mode" to Elevate without prompting.
  2. Set "User Account Control: Detect application installations and prompt for elevation" to Disabled.
  3. Set "User Account Control: Run all administrators in Admin Approval Mode" to Disabled.
  4. Set "User Account Control: Only elevate UIAccess applications that are installed in secure locations" to Disabled.

The LGPE automatically saves all changes, so exit it and reboot.

Please read more here:

https://superuser.com/questions/1002262/run-applications-as-administrator-by-default-in-windows-10

Common Internet File System (CIFS) – Windows 10 and Windows 7 – Accessing SMB1 Using Anonymous (guest) Account

Tuesday, January 28th, 2020

Common Internet File System (CIFS) – Login Using Anonymous (Guest) Account to Network Shares & NAS Systems

Windows 7:

To map and connect to a network share that is using the SMB1 protocol in Windows, there are a few things that you need to do depending on which version of Windows you use.  In Windows 7, it should be pretty easy.  When mapping the network drive, be sure to check the "Connect using different credentials" box.  For the login, use "anonymous".  Leave the password field blank (don't provide a password).

Windows 10:

Windows 10 doesn't support the SMB1 protocol by default.  However, it can be enabled.  To enable SMB1 support, go to the Control Panel, click on "Programs and Features", and then click on the "Turn Windows features on or off" link in the left sidebar.  Under the "SMB 1.0" category, enable the "SMB 1.0/CIFS Client" by clicking the checkbox and making sure it's in a checked state.  Uncheck the "SMB 1.0/CIFS Automatic Removal" entry if it's enabled as it will cause anonymous logins to SMB1.0 shares to fail.

The next step is to configure Windows 10 to allow anonymous logins to network shares.

To enable access under the guest account from your computer, you need to use the Group Policy Editor (gpedit.msc). Go to the section: Computer Configuration -> Administrative templates -> Network -> Lanman Workstation. Find and enable the policy "Enable insecure guest logons". These policy settings determine whether the SMB client will allow the guest logon to the SMB server.

More Detailed Guide | Archived Copy

Windows 7 and 10:

If you get a message that a drive is already mapped using different credentials, simply map the connection using its IP address instead rather than its name.